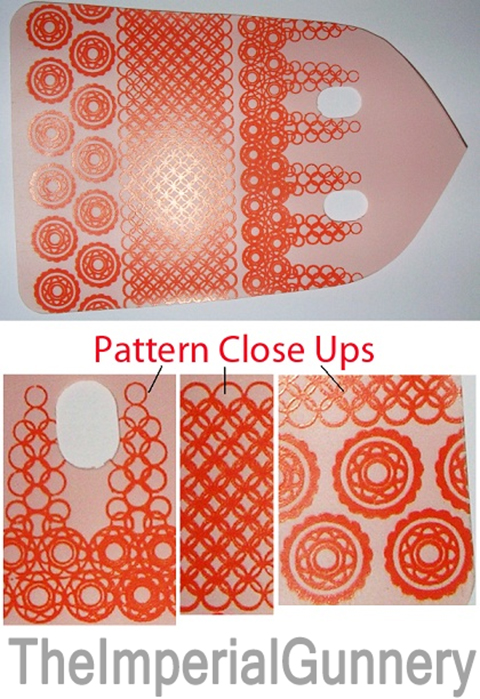
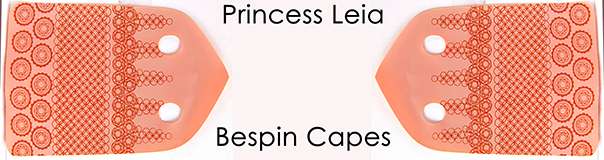
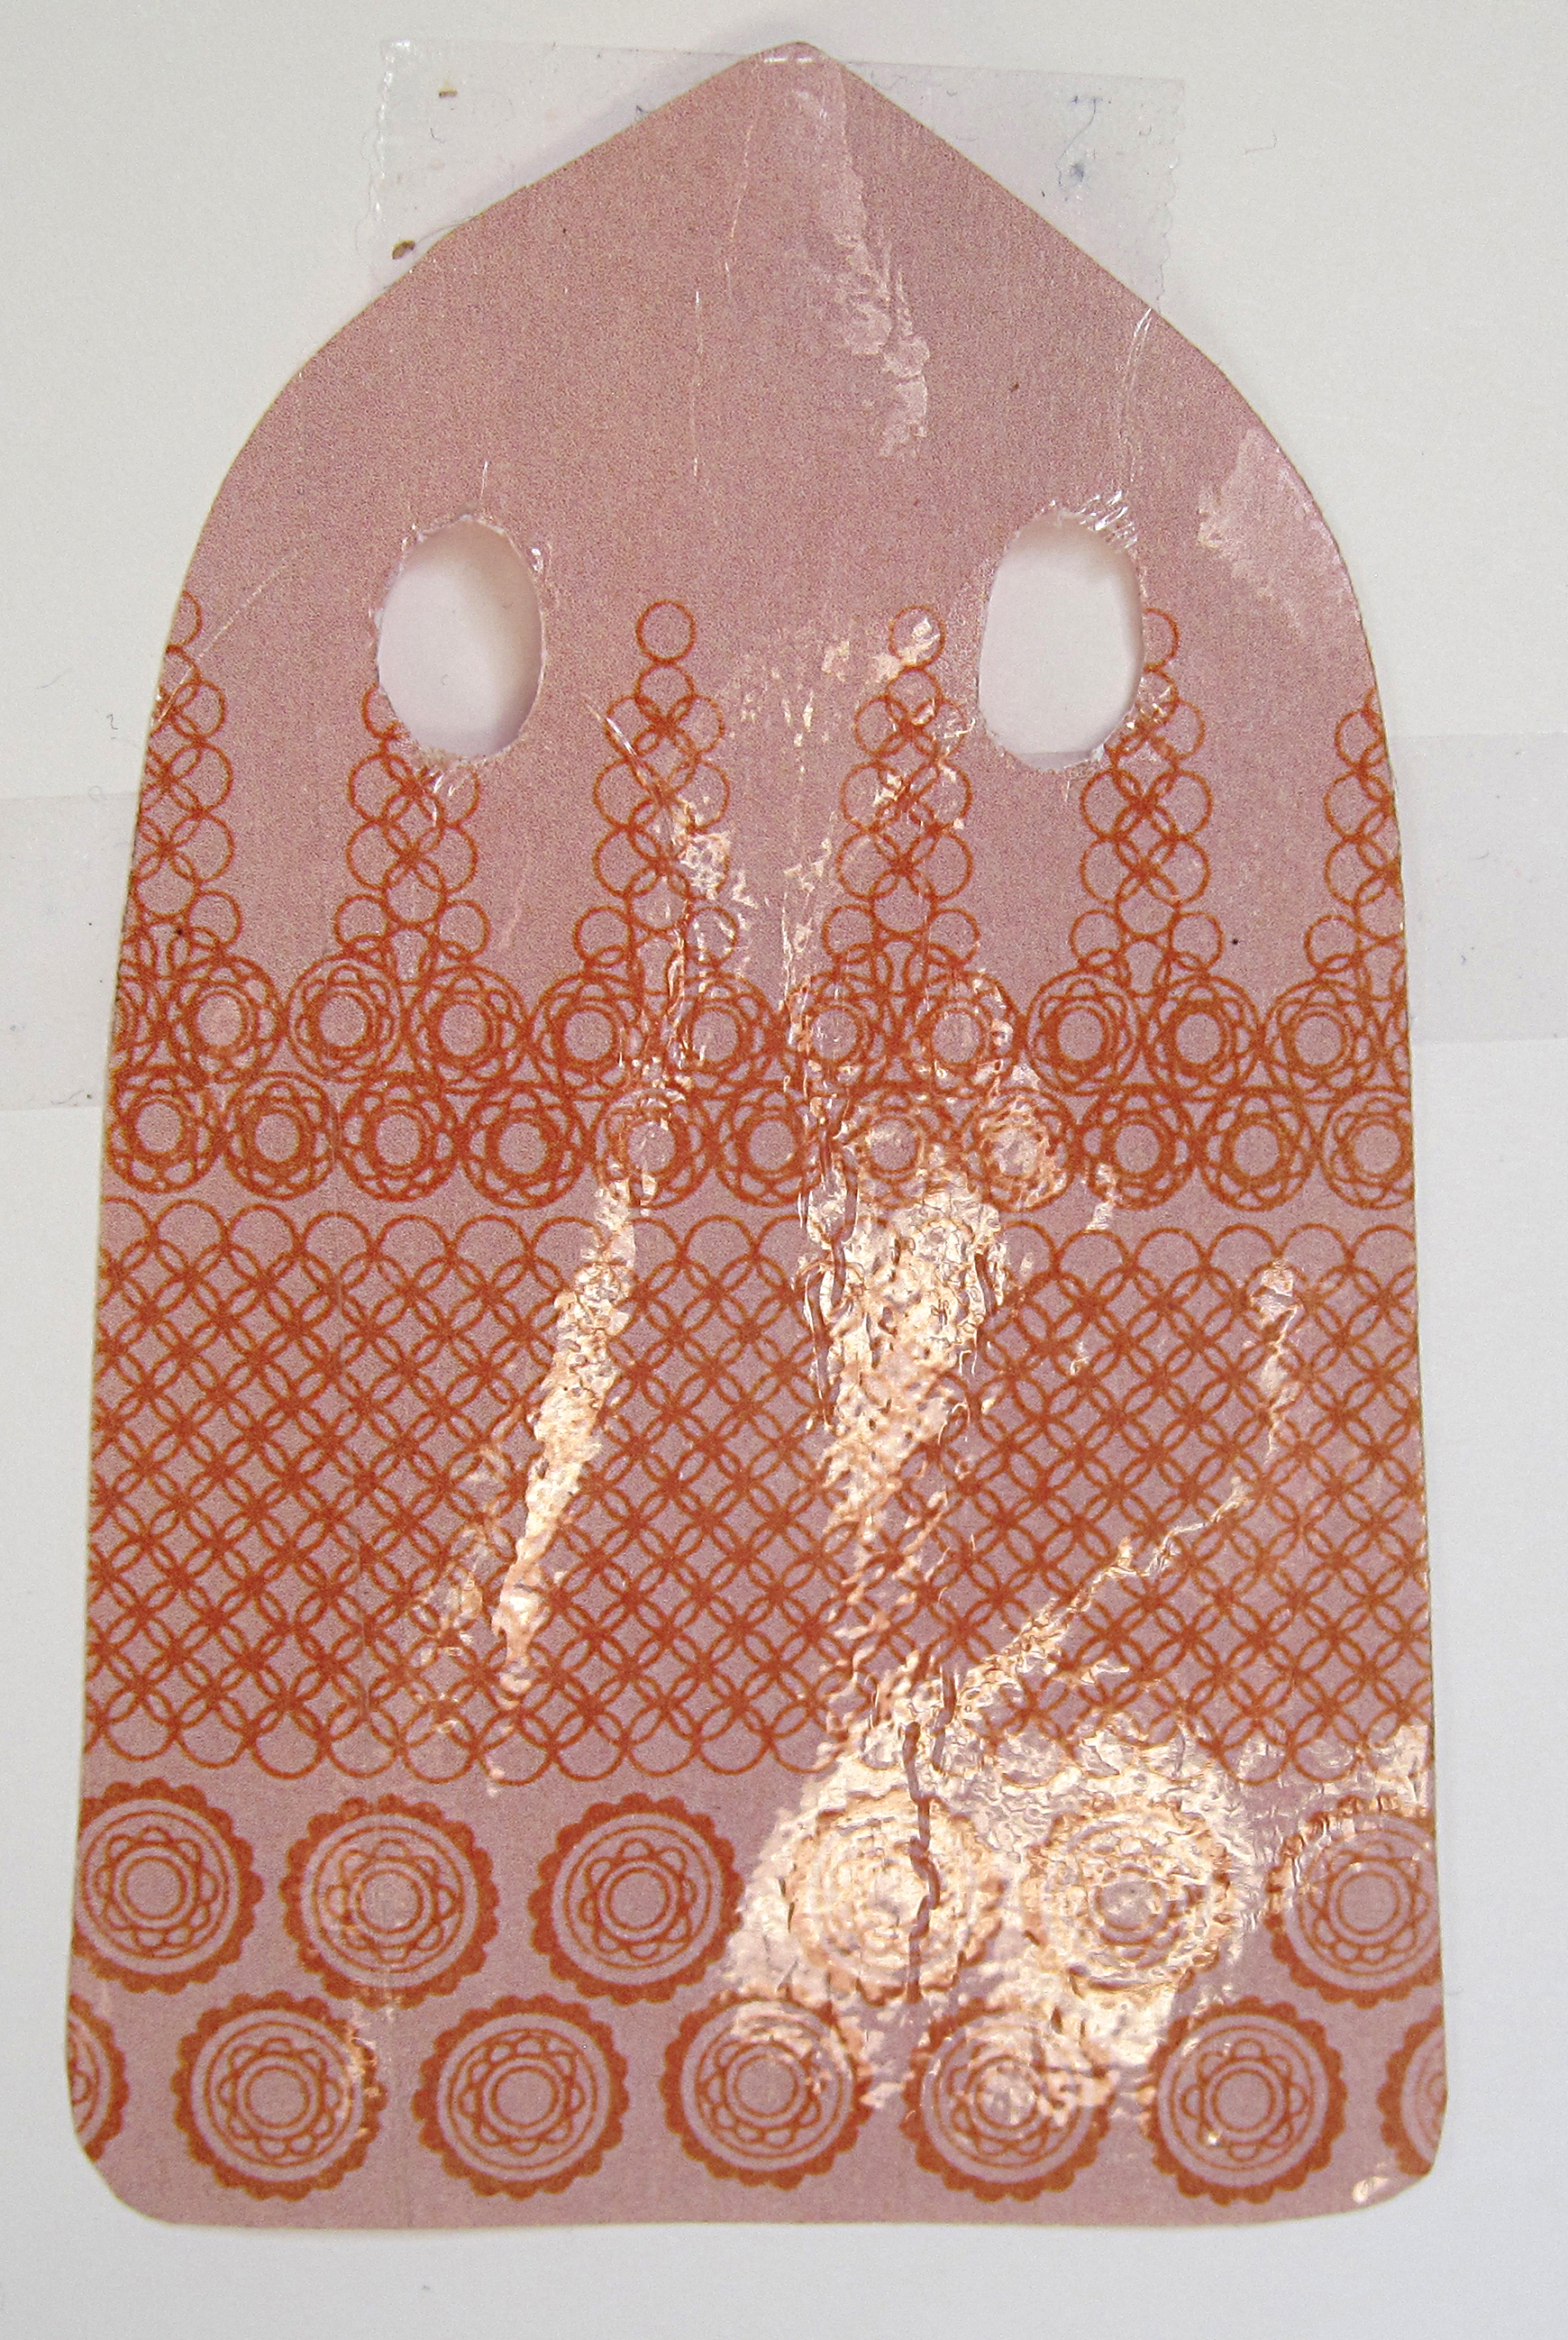
The cape that she shipped with was a pink cape vinyl cape with a very detailed pattern. This was the only vinyl cape that had a printed side.
The printed side was on the outside of the cape.
Typical of all genuine Star Wars vinyl cape accessories, there would be a zipping sound made when you run the edge of your finger nail along the cape.
The sound could be heard either on the printed or non-printed side.
The patterns seen on these capes can vary slightly in color and quality.
Since these patterns were printed on (ink or paint, I am not sure) the amount applied can vary and make the patterns bleed a little into the patterns causing slightly different looks.
The cape was printed on a larger sheet so when each cape gets cut, the pattern can be placed in slightly different positions from cape to cape. There is a distinct overall pattern being used and some capes have more of one trait than the next.
Like everything, there were a few different variations of the cape that could be found.
Here is a quick ID chart that shows the major ID points that I will mention later on.
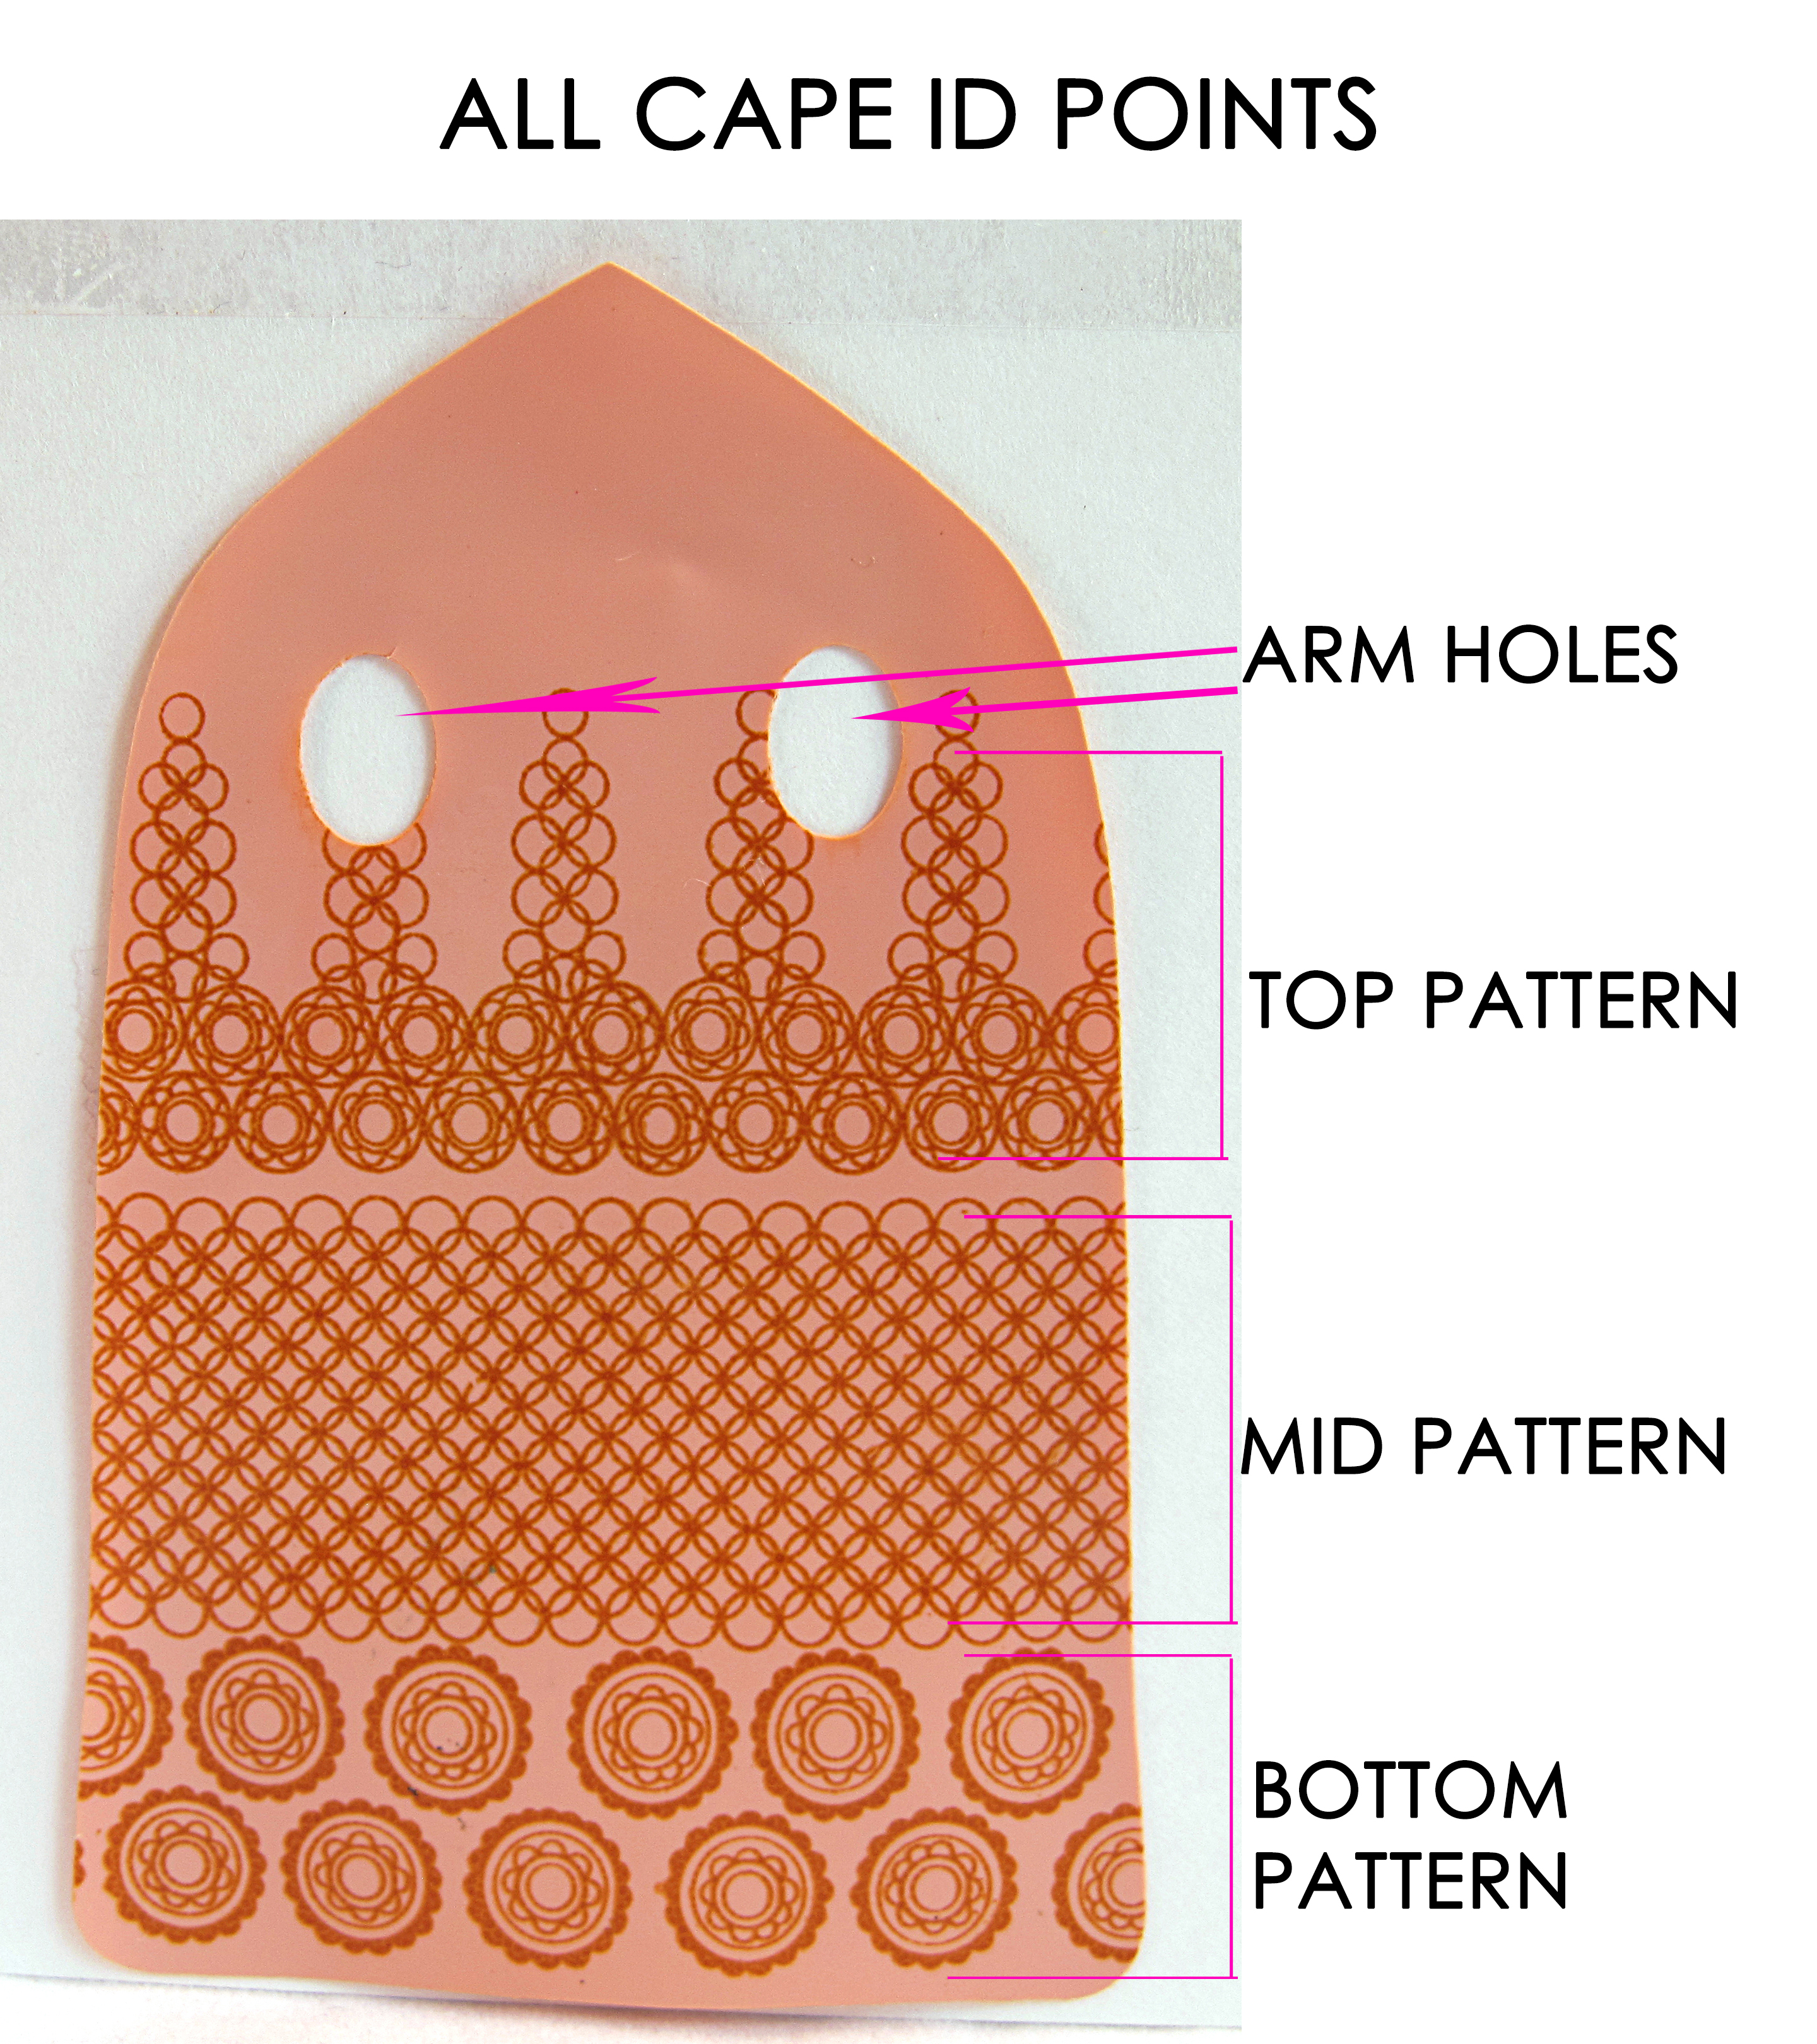
The three (3) main pattern areas may be abbreviated as TOP, MID and/or BOT within the guide.
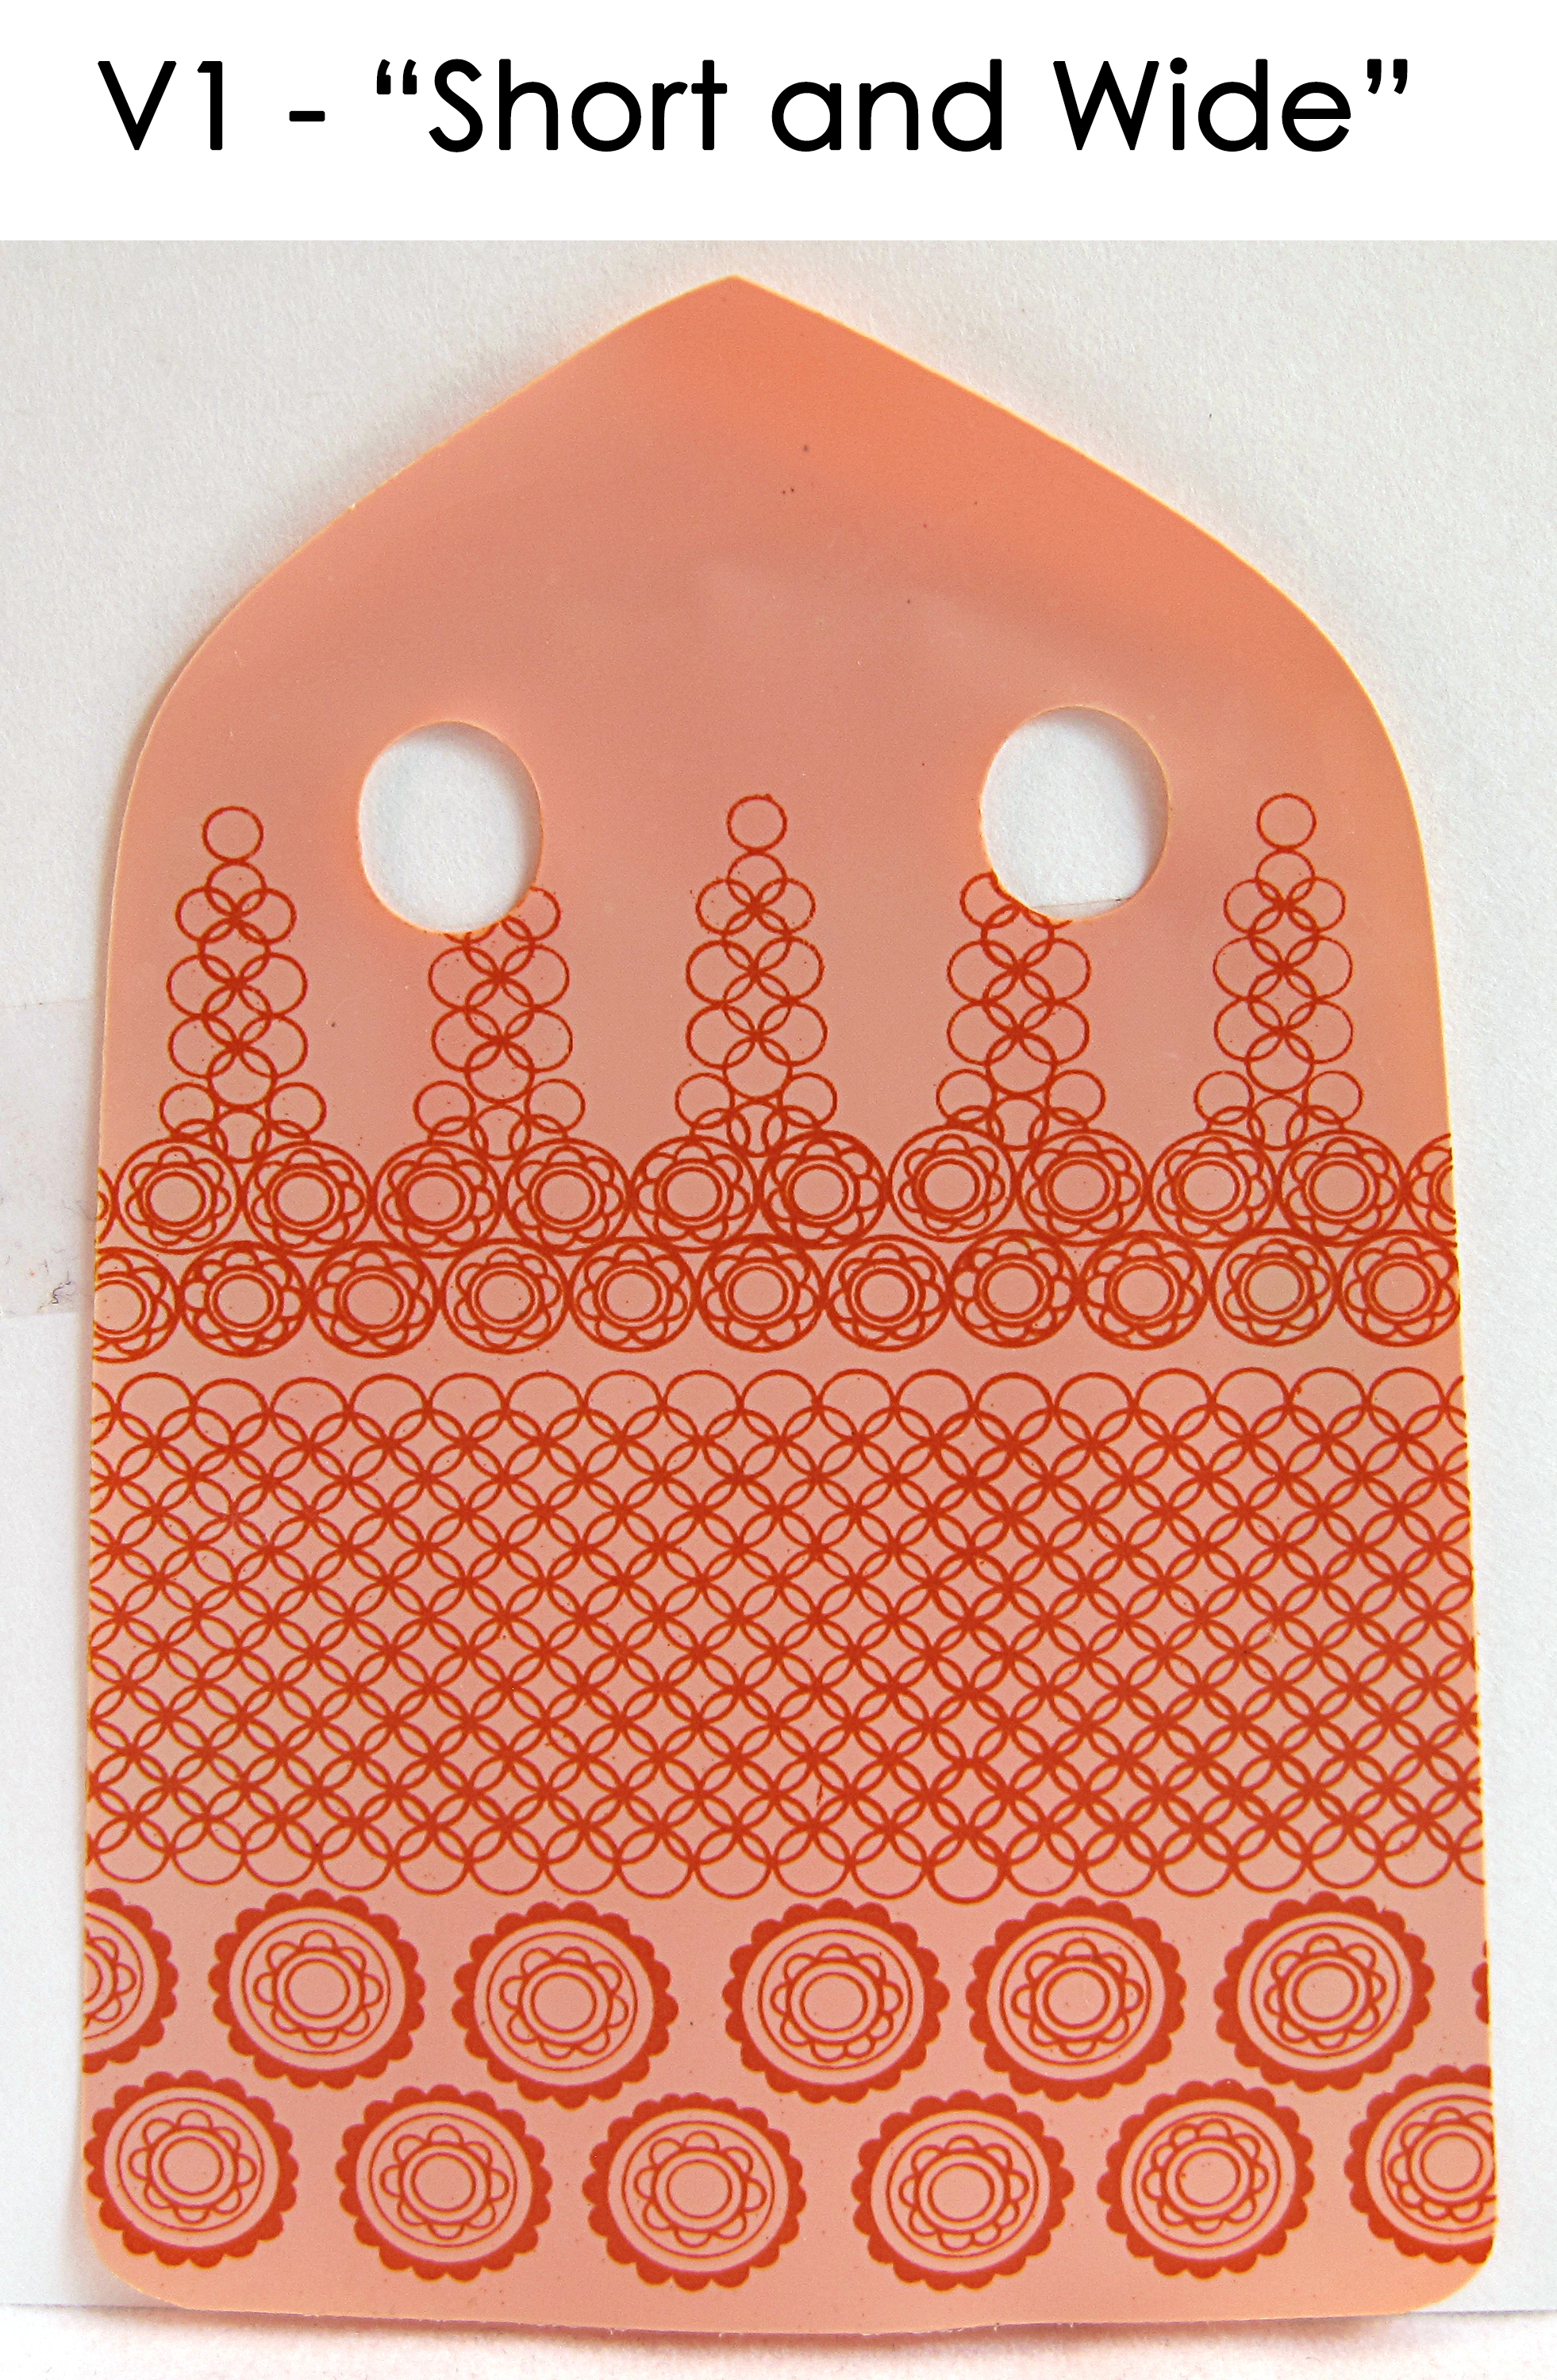
The V1 Cape is short and wide compared to most capes you will find.
It can vary slightly in length by a couple more milimeters but still is much different than the V2 and V3 capes.
The material is somewhat rigid and is not very shiny like some other capes.
The pattern normally is very thin and crisp. Although that is the norm, it is not the rule. The pattern can be found thicker than shown.
These capes also seem prone to discoloring leaving the capes a more yellowish tone and the pattern washes out.
Click here to see a comparison of the wide vs narrow capes now, or continue reading on and you will get to it.
These capes are confirmed to be found on:
COO#3 - Crew Necks & COO#6 - Turtle Necks
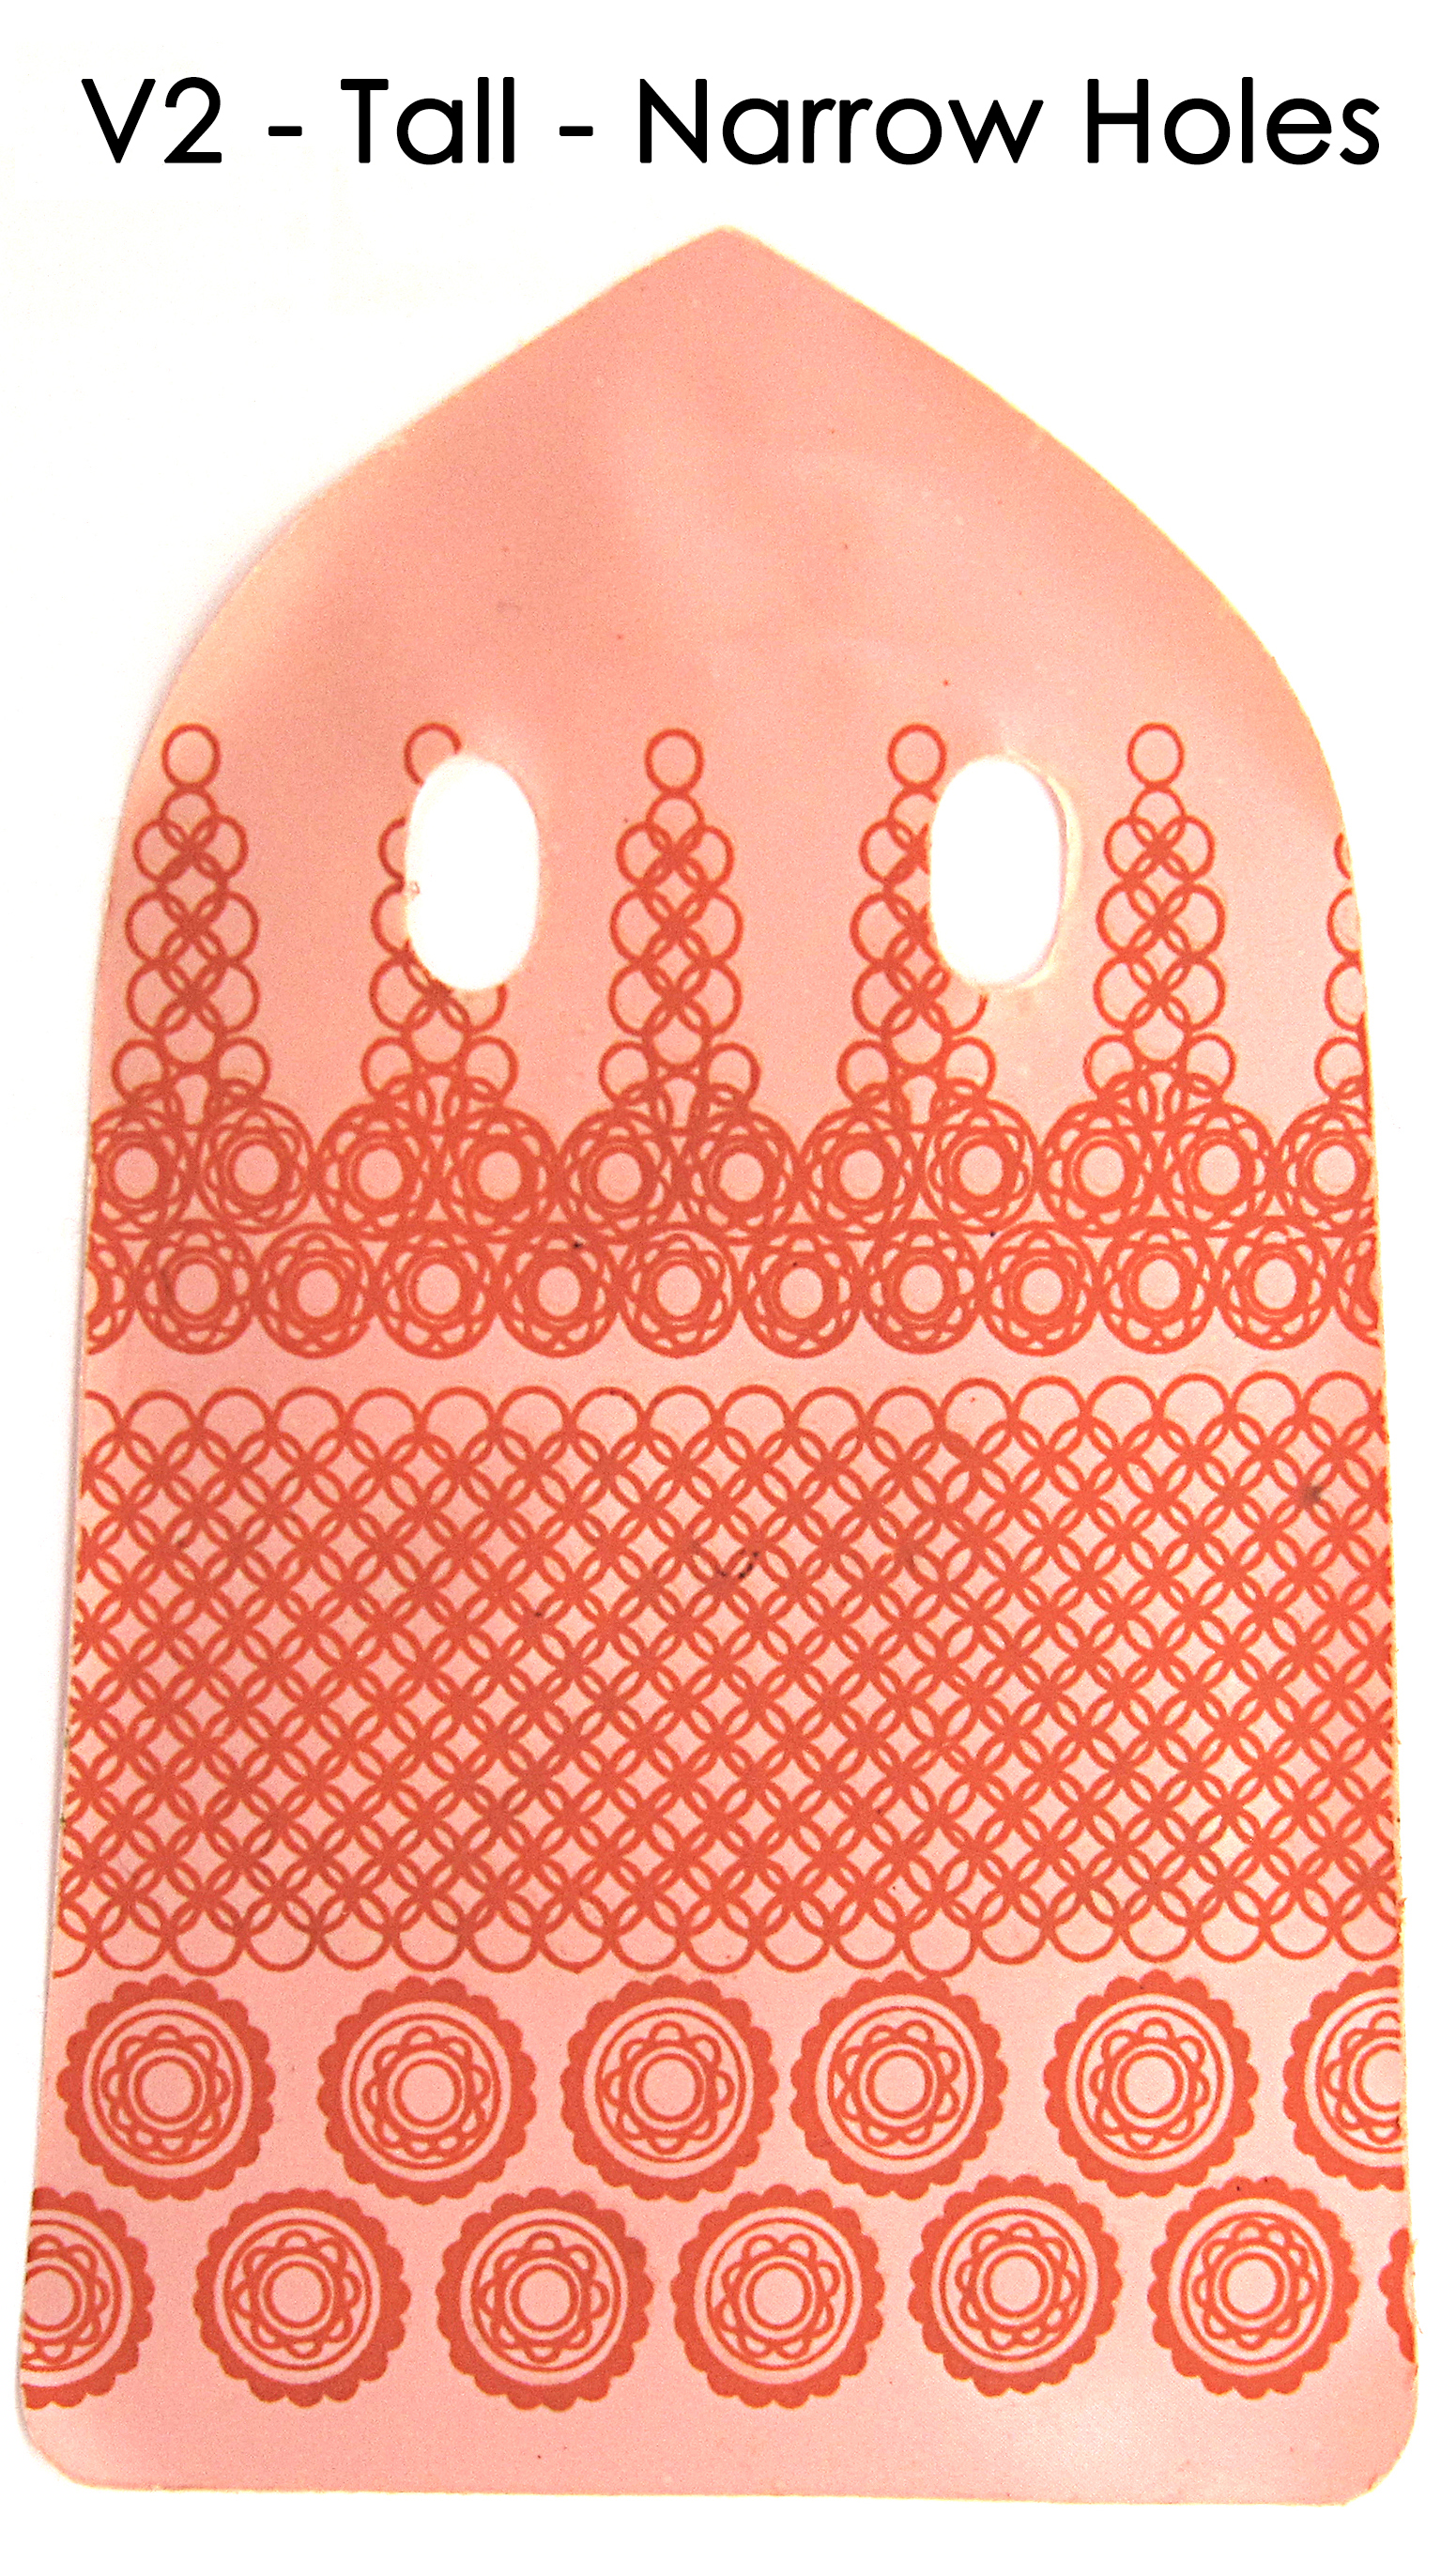
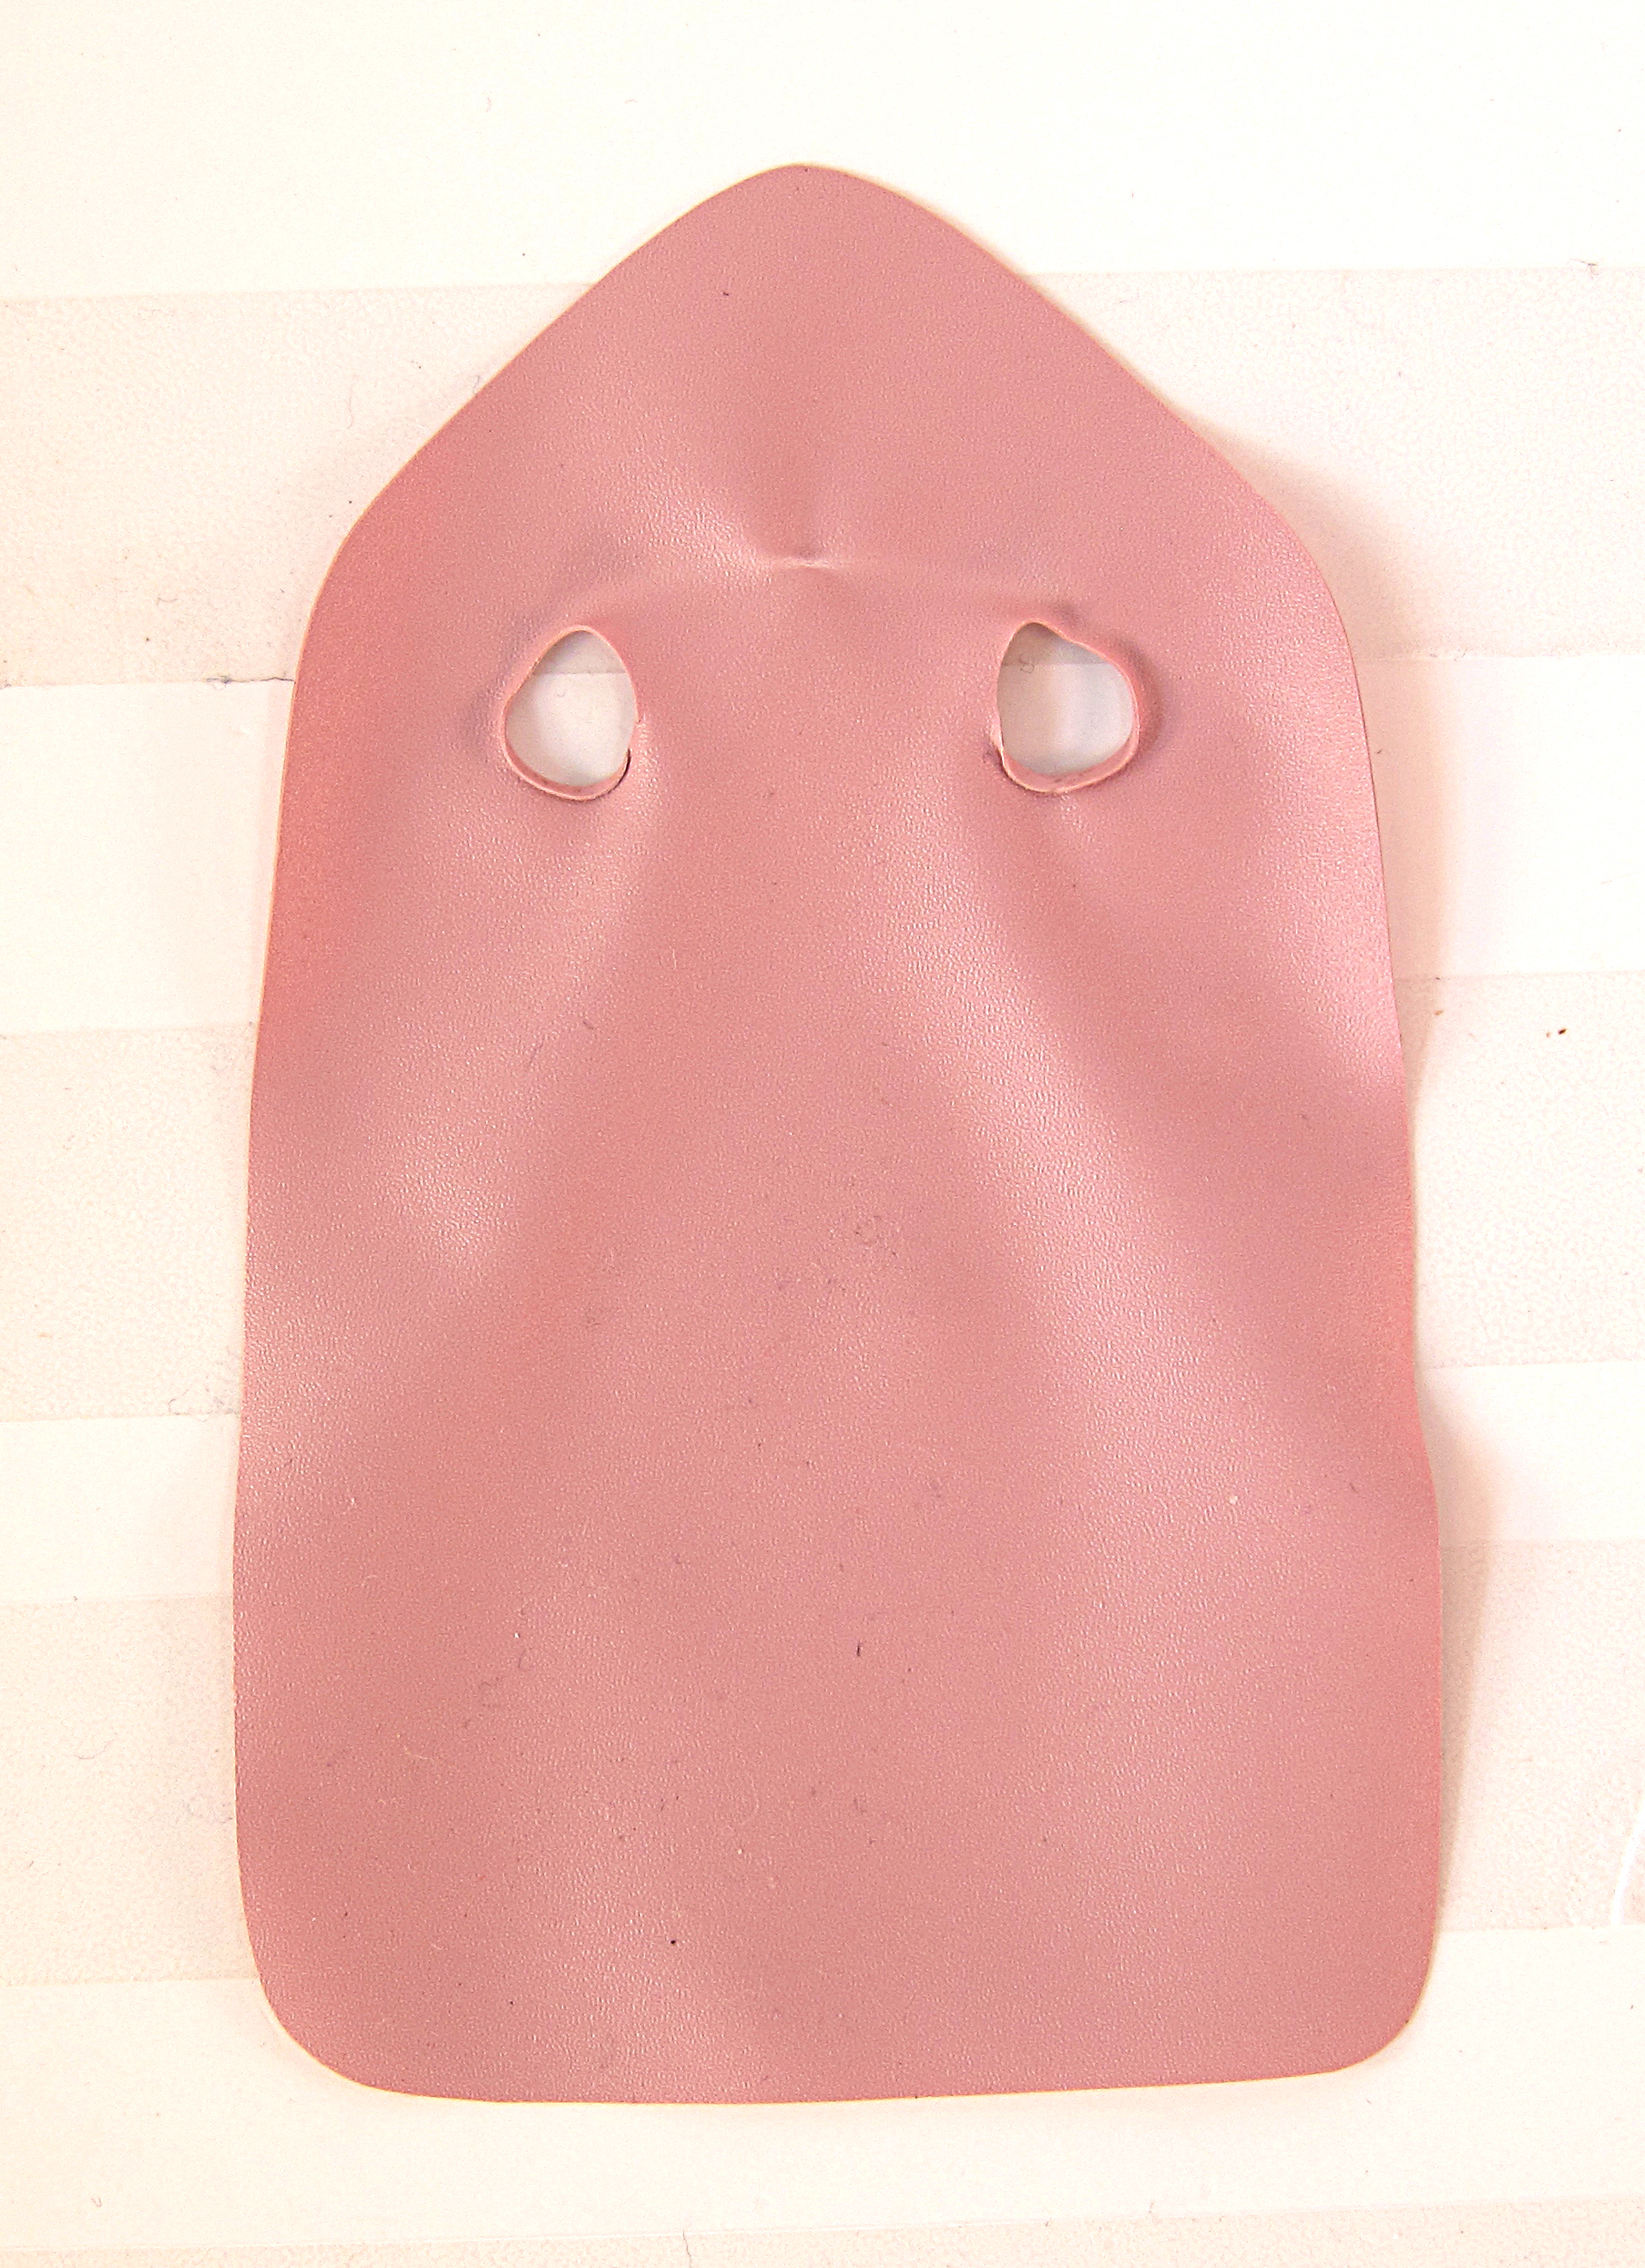
This cape is nearly visually identical to the V3 capes. The major differences you can easily see can be seen in the arm holes.
If you look at the arm hole area compared to the V3 type, you will see they are much narrower. This is difficult to see if the cape is damaged or wrinkled up.
This version is commonly made from a very thin, very flexible material and feels very 'rubbery'. The material tends to be very shiny compared to the others as well. It can be found with slightly differnt materials as well.
The pattern can also feel a little more raised as if there was a little more ink used during the printing and the pattern itself can be slightly thinner to slighter thicker in the patterns from cape to cape.
The pattern normally is a little thicker than the V1 and V3 capes. Although that is the norm, it is not the rule. The pattern can be found thinner and even much thicker than shown.
V2A - Narrow Arm Holes - Repeating Pattern
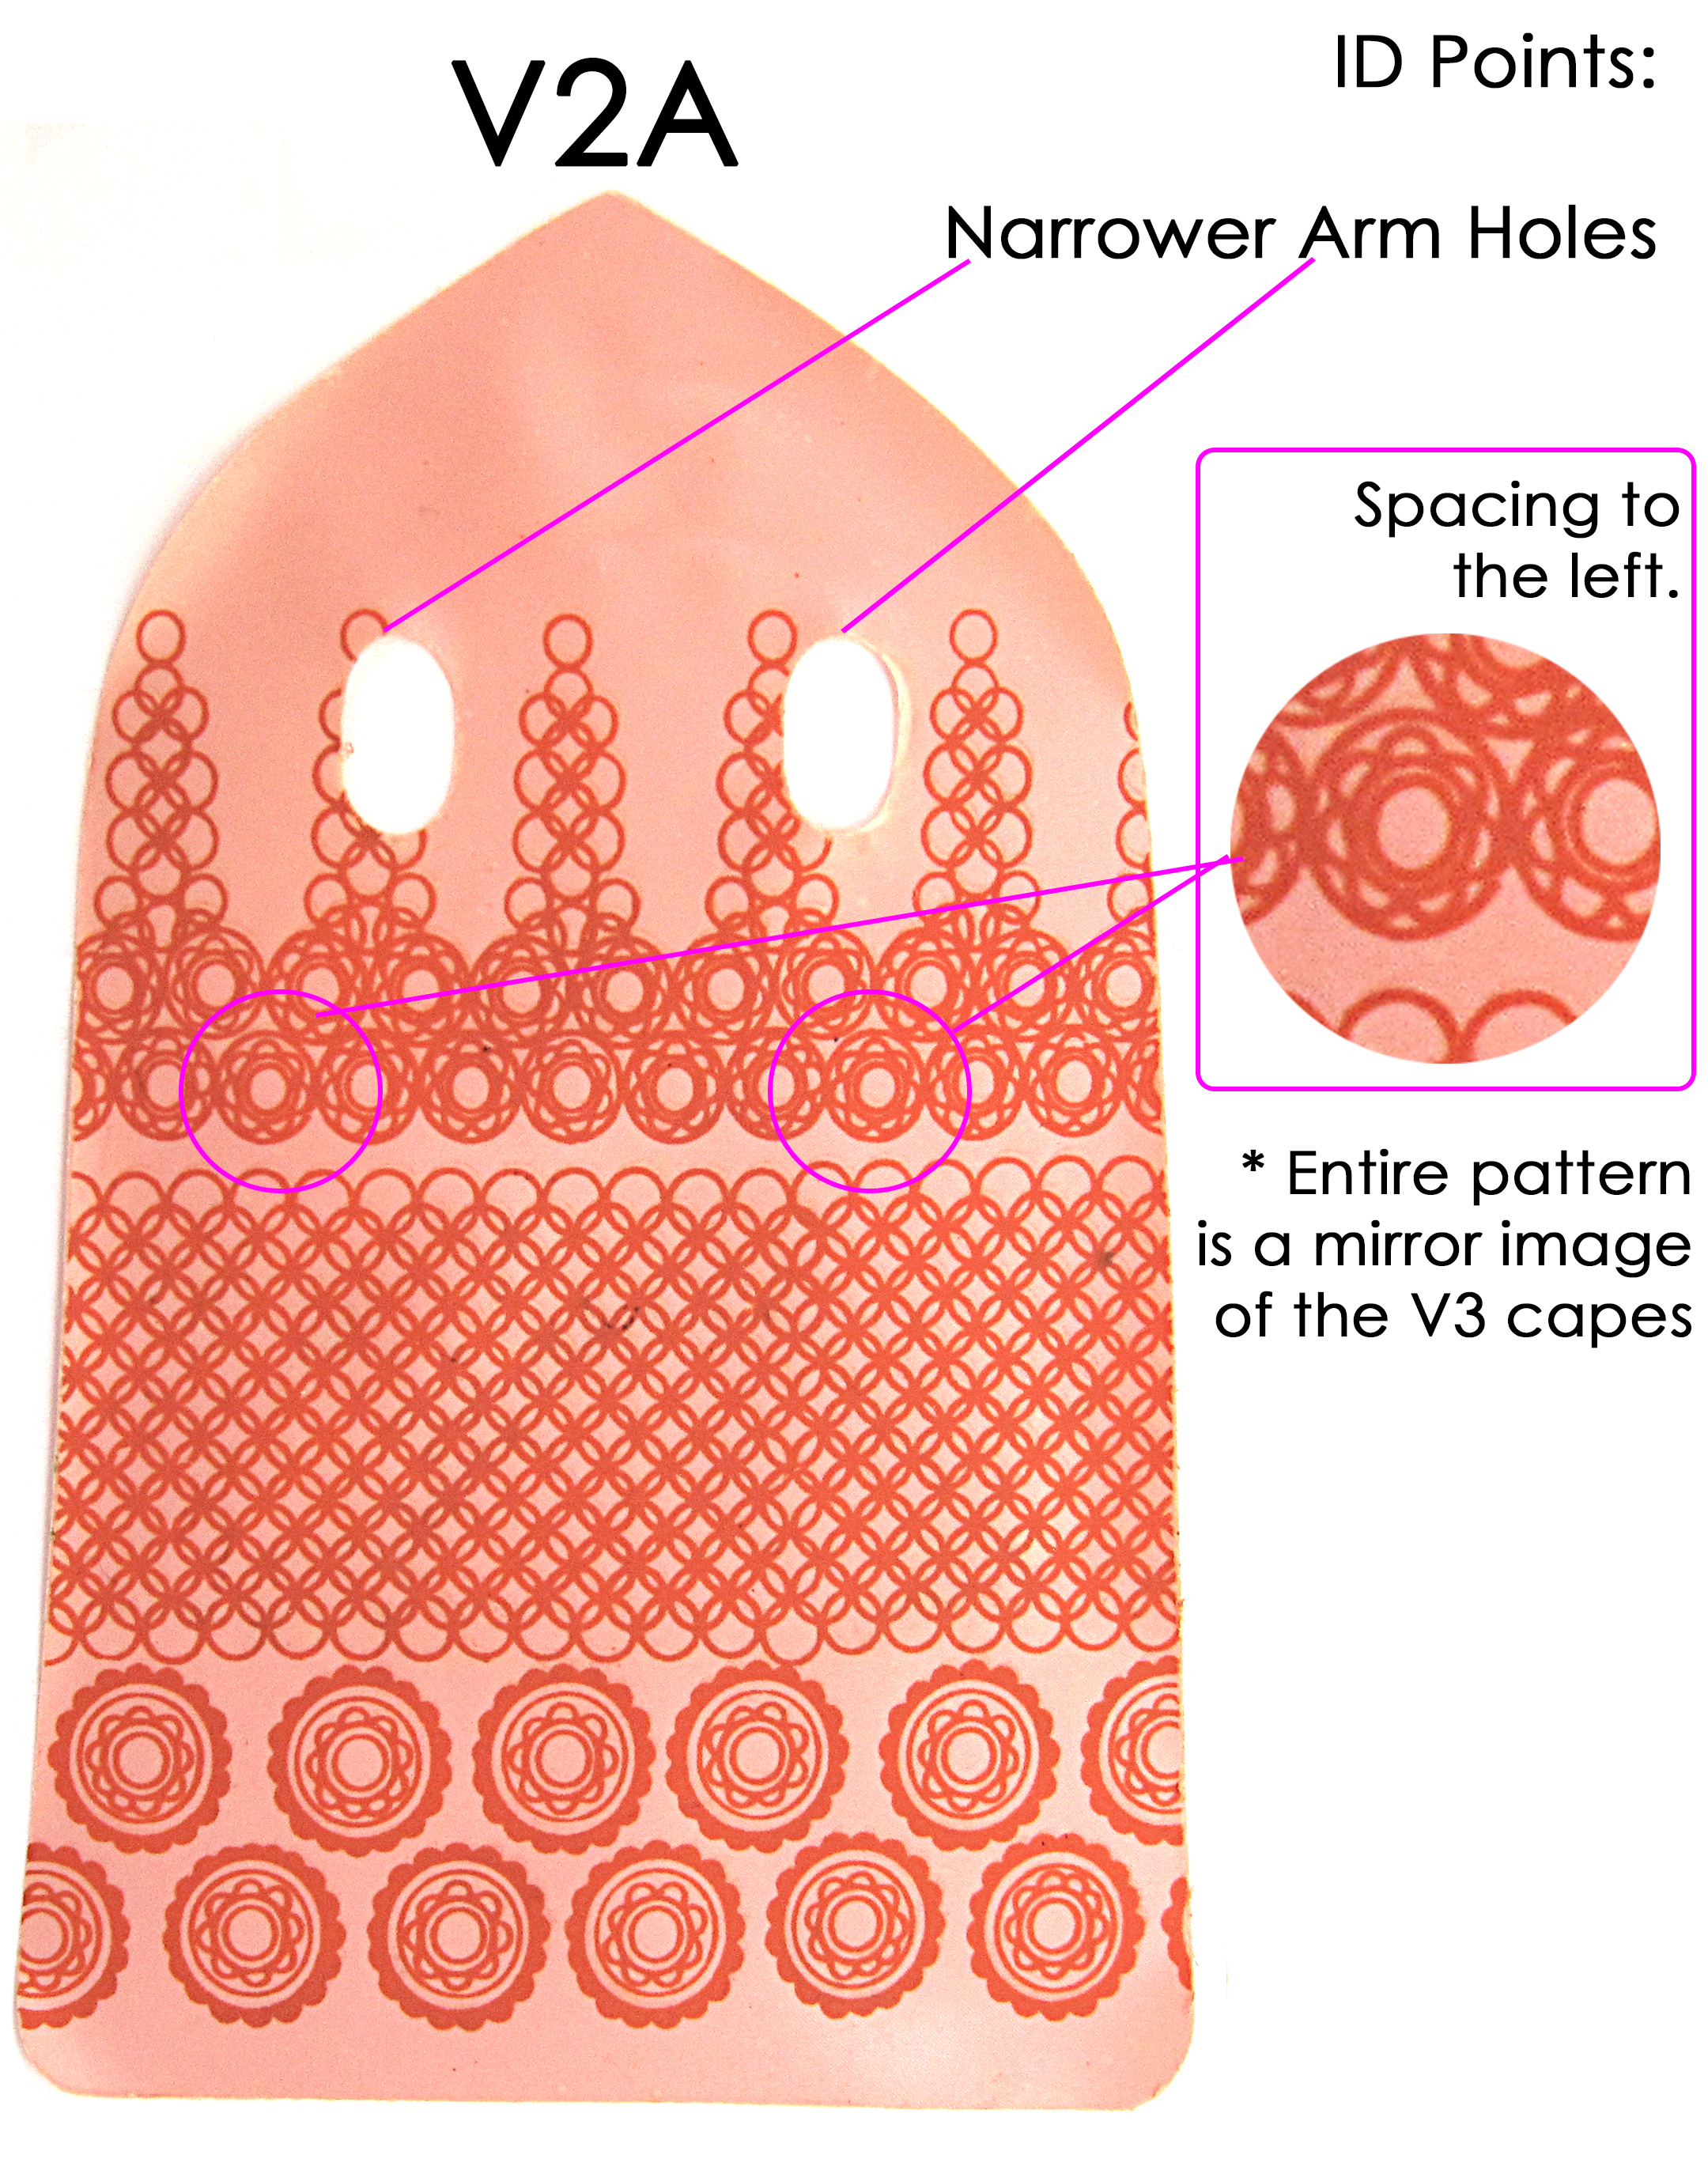
NOTE: If you look at the pattern in V2A, you will see an area in the top pattern where one circle doesn't touch the others at specific intervals. In the V2 capes, the gap is always to the left.
The pattern printed for the V2A is a mirror image of that used on the V3A capes and hence, the space on the circle on the V3 capes always is to the right.
These capes are confirmed to be found on:
COO#1 Crew Necks (Green/Flesh Necks) 1A, 1B
COO#1 Turtle Necks 1C & COO#4 Crew Necks 4A
V2B - Narrow Arm Holes - Non-Repeating Pattern

These capes are confirmed to be found on:
COO#1 Turtle Necks 1D, 1E, 1F & 1F Red
COO#4 Turtle Necks 4A
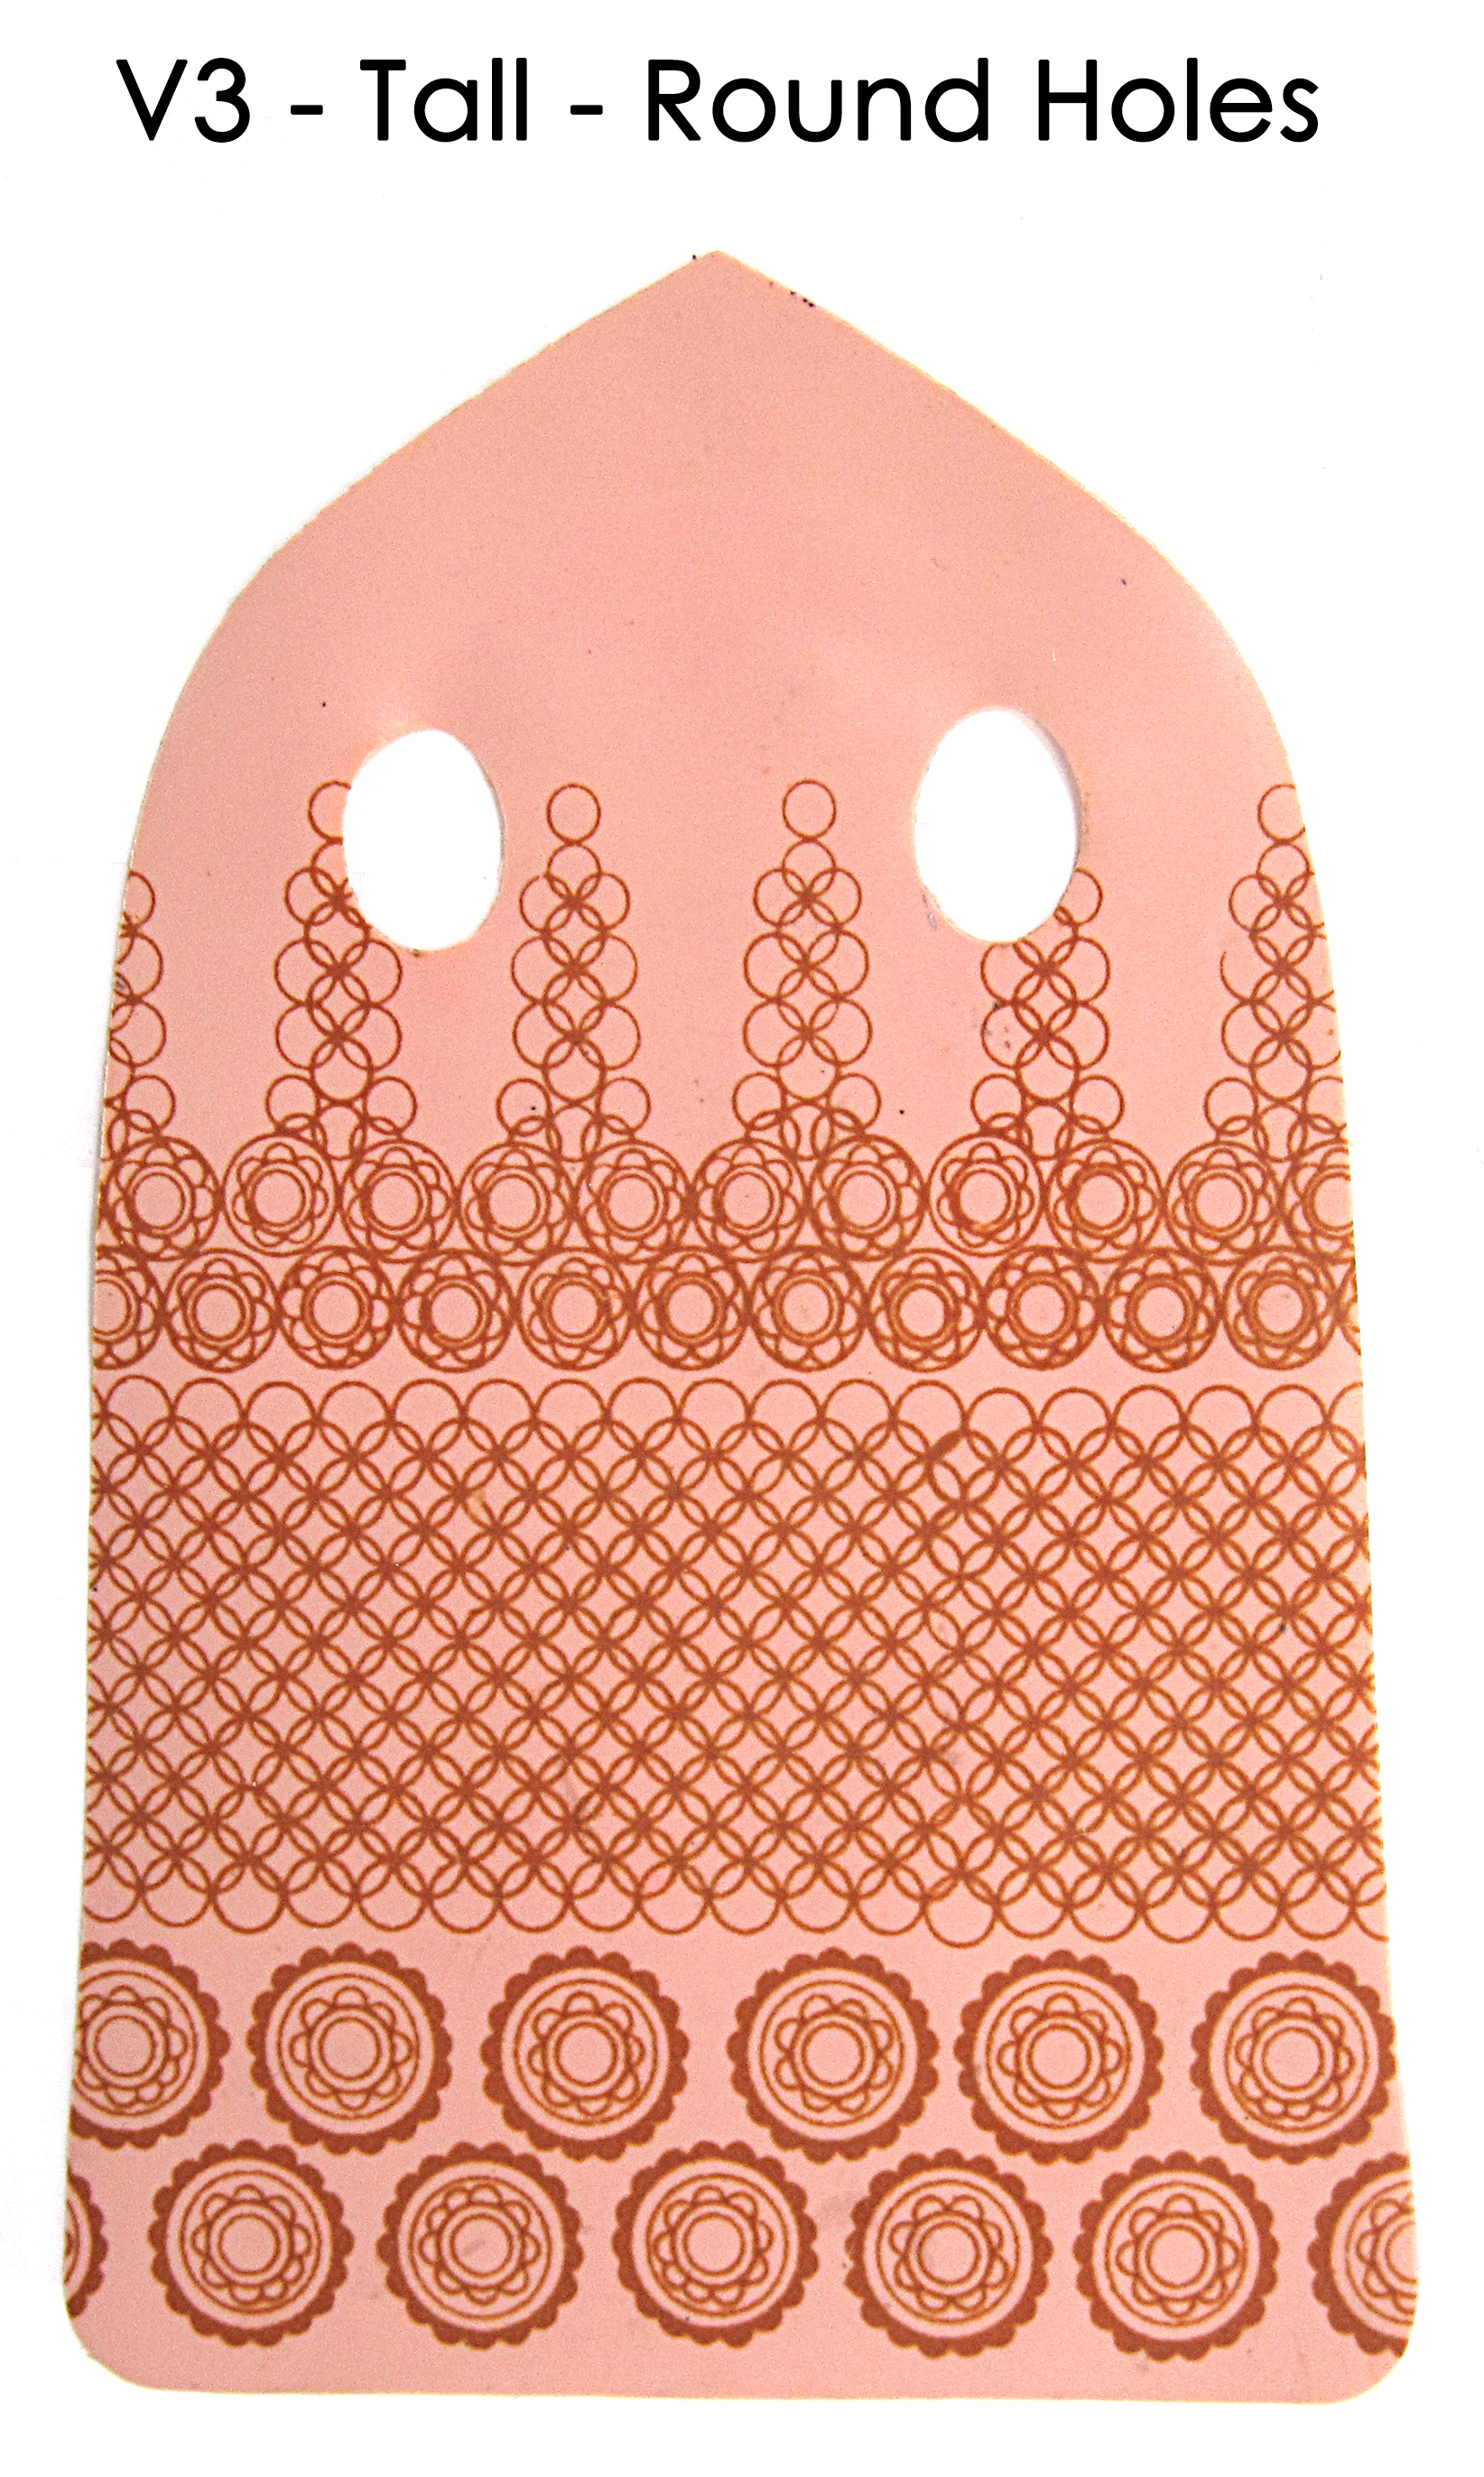
The V3 is probably the most very common style of cape you will find.
I have nicknamed it "Common" and Round Holes since it is very common and the arm holes are more round than the last variation (V2).
In reality the arm holes are oval but the V2 cape already was being referred to as having oval arm holes or narrow arm holes so it made sense for me to simply call this one round arm holes since they are definitely wider and more rounded in comparison.
Sorry if that causes any confusion, but look at V2 carefully and it should be more evident.
Though this variation is the most common out there, there are three (3) variations of the pattern you will find as well as many variations of the material used.
For materials, you can find some somewhat rigid and thick vinyl, thinner and more flexible vinyl as well as varying degrees of glossiness to the finish. There is also a very unique textured cape as well.
The pattern normally is very thin and sharp. Although that is the norm, it is not the rule. The pattern can be found thicker than shown.
V3A - Smaller Gap between Top Pattern and Middle Pattern areas - round arm holes

These capes are confirmed to be found on:
COO#1 Turtle Neck in ESB-A baggie only (oddity)
COO#2 Crew Necks, COO#3 - Crew & Turtle Necks, COO#5 & COO#6 Turtle Necks
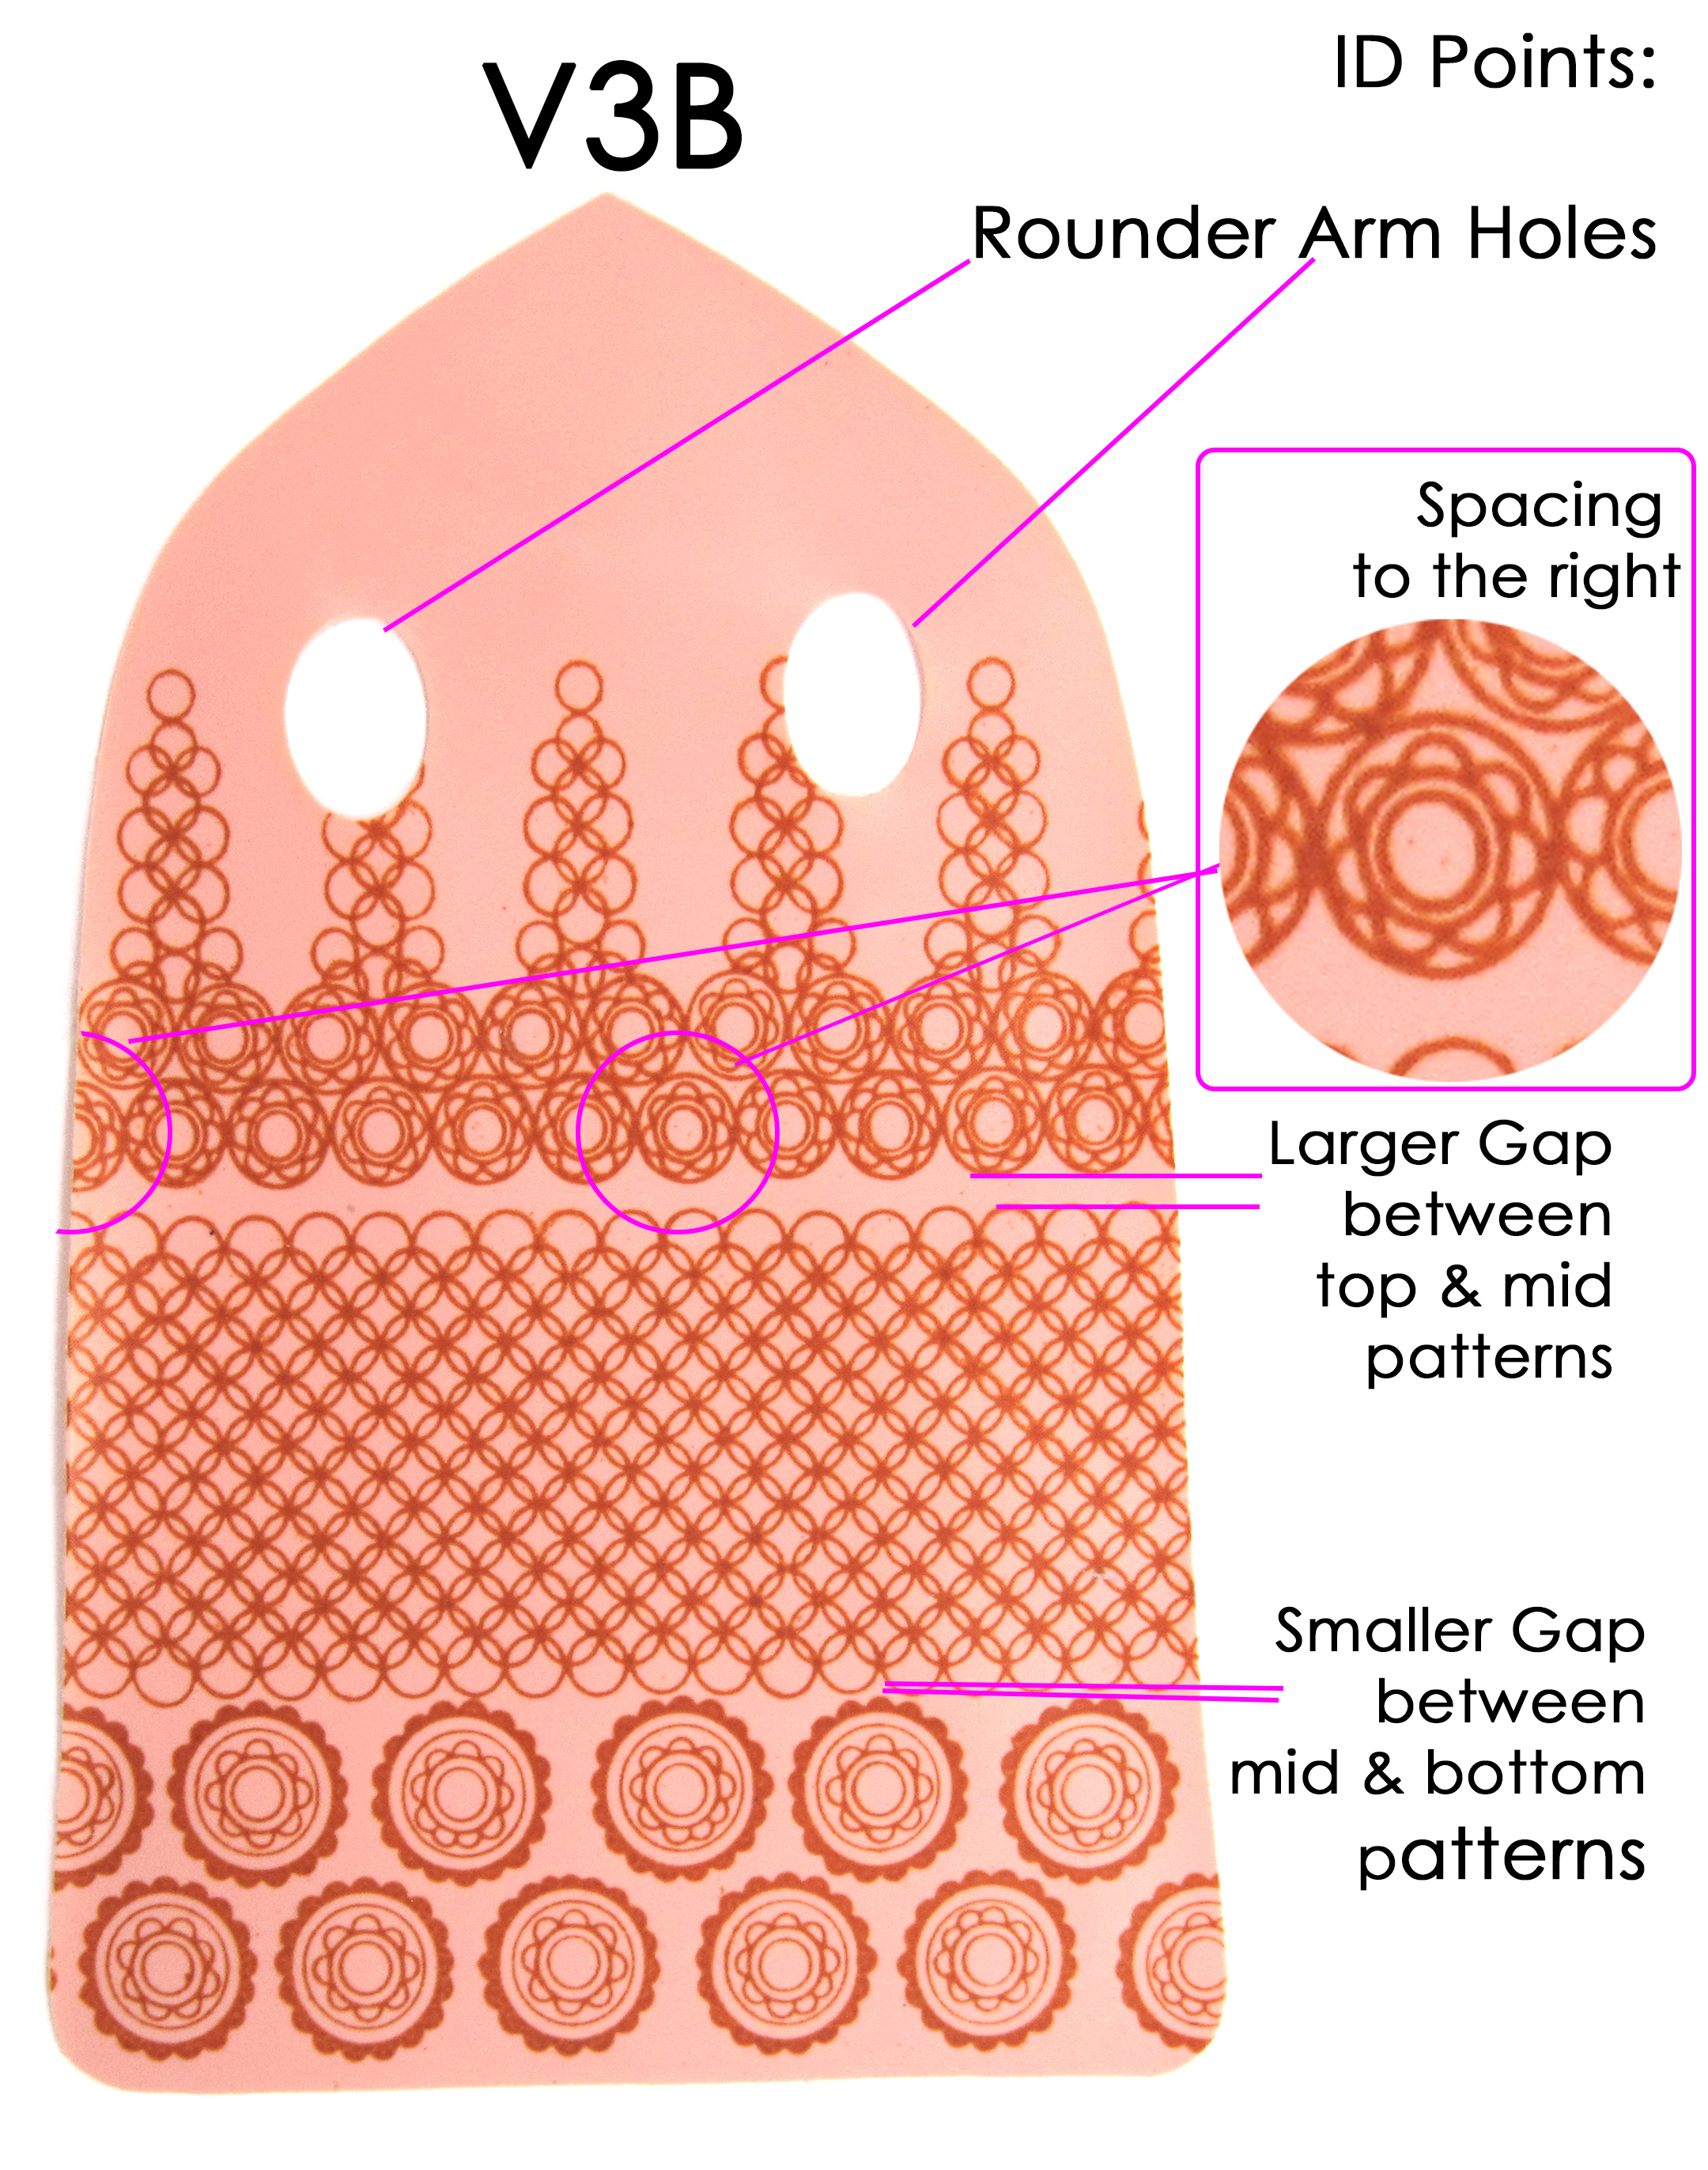
V3B - Larger Gap between Top Pattern and Middle Pattern areas - round arm holes
These capes are confirmed to be found on:
COO#1 Turtle Necks and Crew Necks (Green and Flesh)
COO#2 Crew Necks, COO#3 - Crew & Turtle Necks, COO#5 & COO#6 Turtle Necks
V3C - Textured Material - round arm holes

This cape is an oddity to me. It is shares the same pattern as V3a but the material used is nothing like any other cape found.
The material is very thick and rigid and has a very distinct linear textured pattern that can be seen at the correct angle and simply by feeling it.

The typical zipping sound is present on the inside of the cape (non-printed side).
I have only found this cape three times loose and each time, they were found on a COO#2 Turtle Neck with a slightly pale face and light eye features.
UPDATE 11/15/2013: I have just received a carded example of this figure and cape combo!
This cape can be found carded on Kenner ESB 41B cards. You can see pictures of this in the Packaging Section and/or My Carded Figures
Another interesting point is this figure and cape appear on the 41B card and the 41D card has the regular 'Pale Face' with a V3 figure and they BOTH were made in the same factory.
The factory was the Hong Kong Unitoys factory (factory code "U").
Interesting to see the two different combos come out so close to each with these differences.
These capes are confirmed to be found on:
COO#2 Pale Pink Face

This cape is exclusive to Lili Ledy's regular figure with COO#4 (Family #1 Altered - 4B. This is not the same as can be found on the Lili Ledy 'Blonde'.
It is a Short and Wide style.
You can see the gap between TOP & MID is wider and the gap between MID and BOT are wider as well.
But the easiest area to confirm easily is the bottom pattern area. Each circle in the pattern in the bottom pattern area is spaced further apart by a lot more than all other versions and are evenly distributed unlike the Kenner capes. This really helps make it very easy to confirm.
These capes are confirmed to be found on:
COO#4 Crew Necks (Lili Ledy ONLY)
V1 and V2 have a stubby appearance which is why I call them short and wide or medium and wide, where as all the other capes (except V5's Lili Ledy) share a taller and narrow overall shape.
Height comparisons of V1, V2 and V3
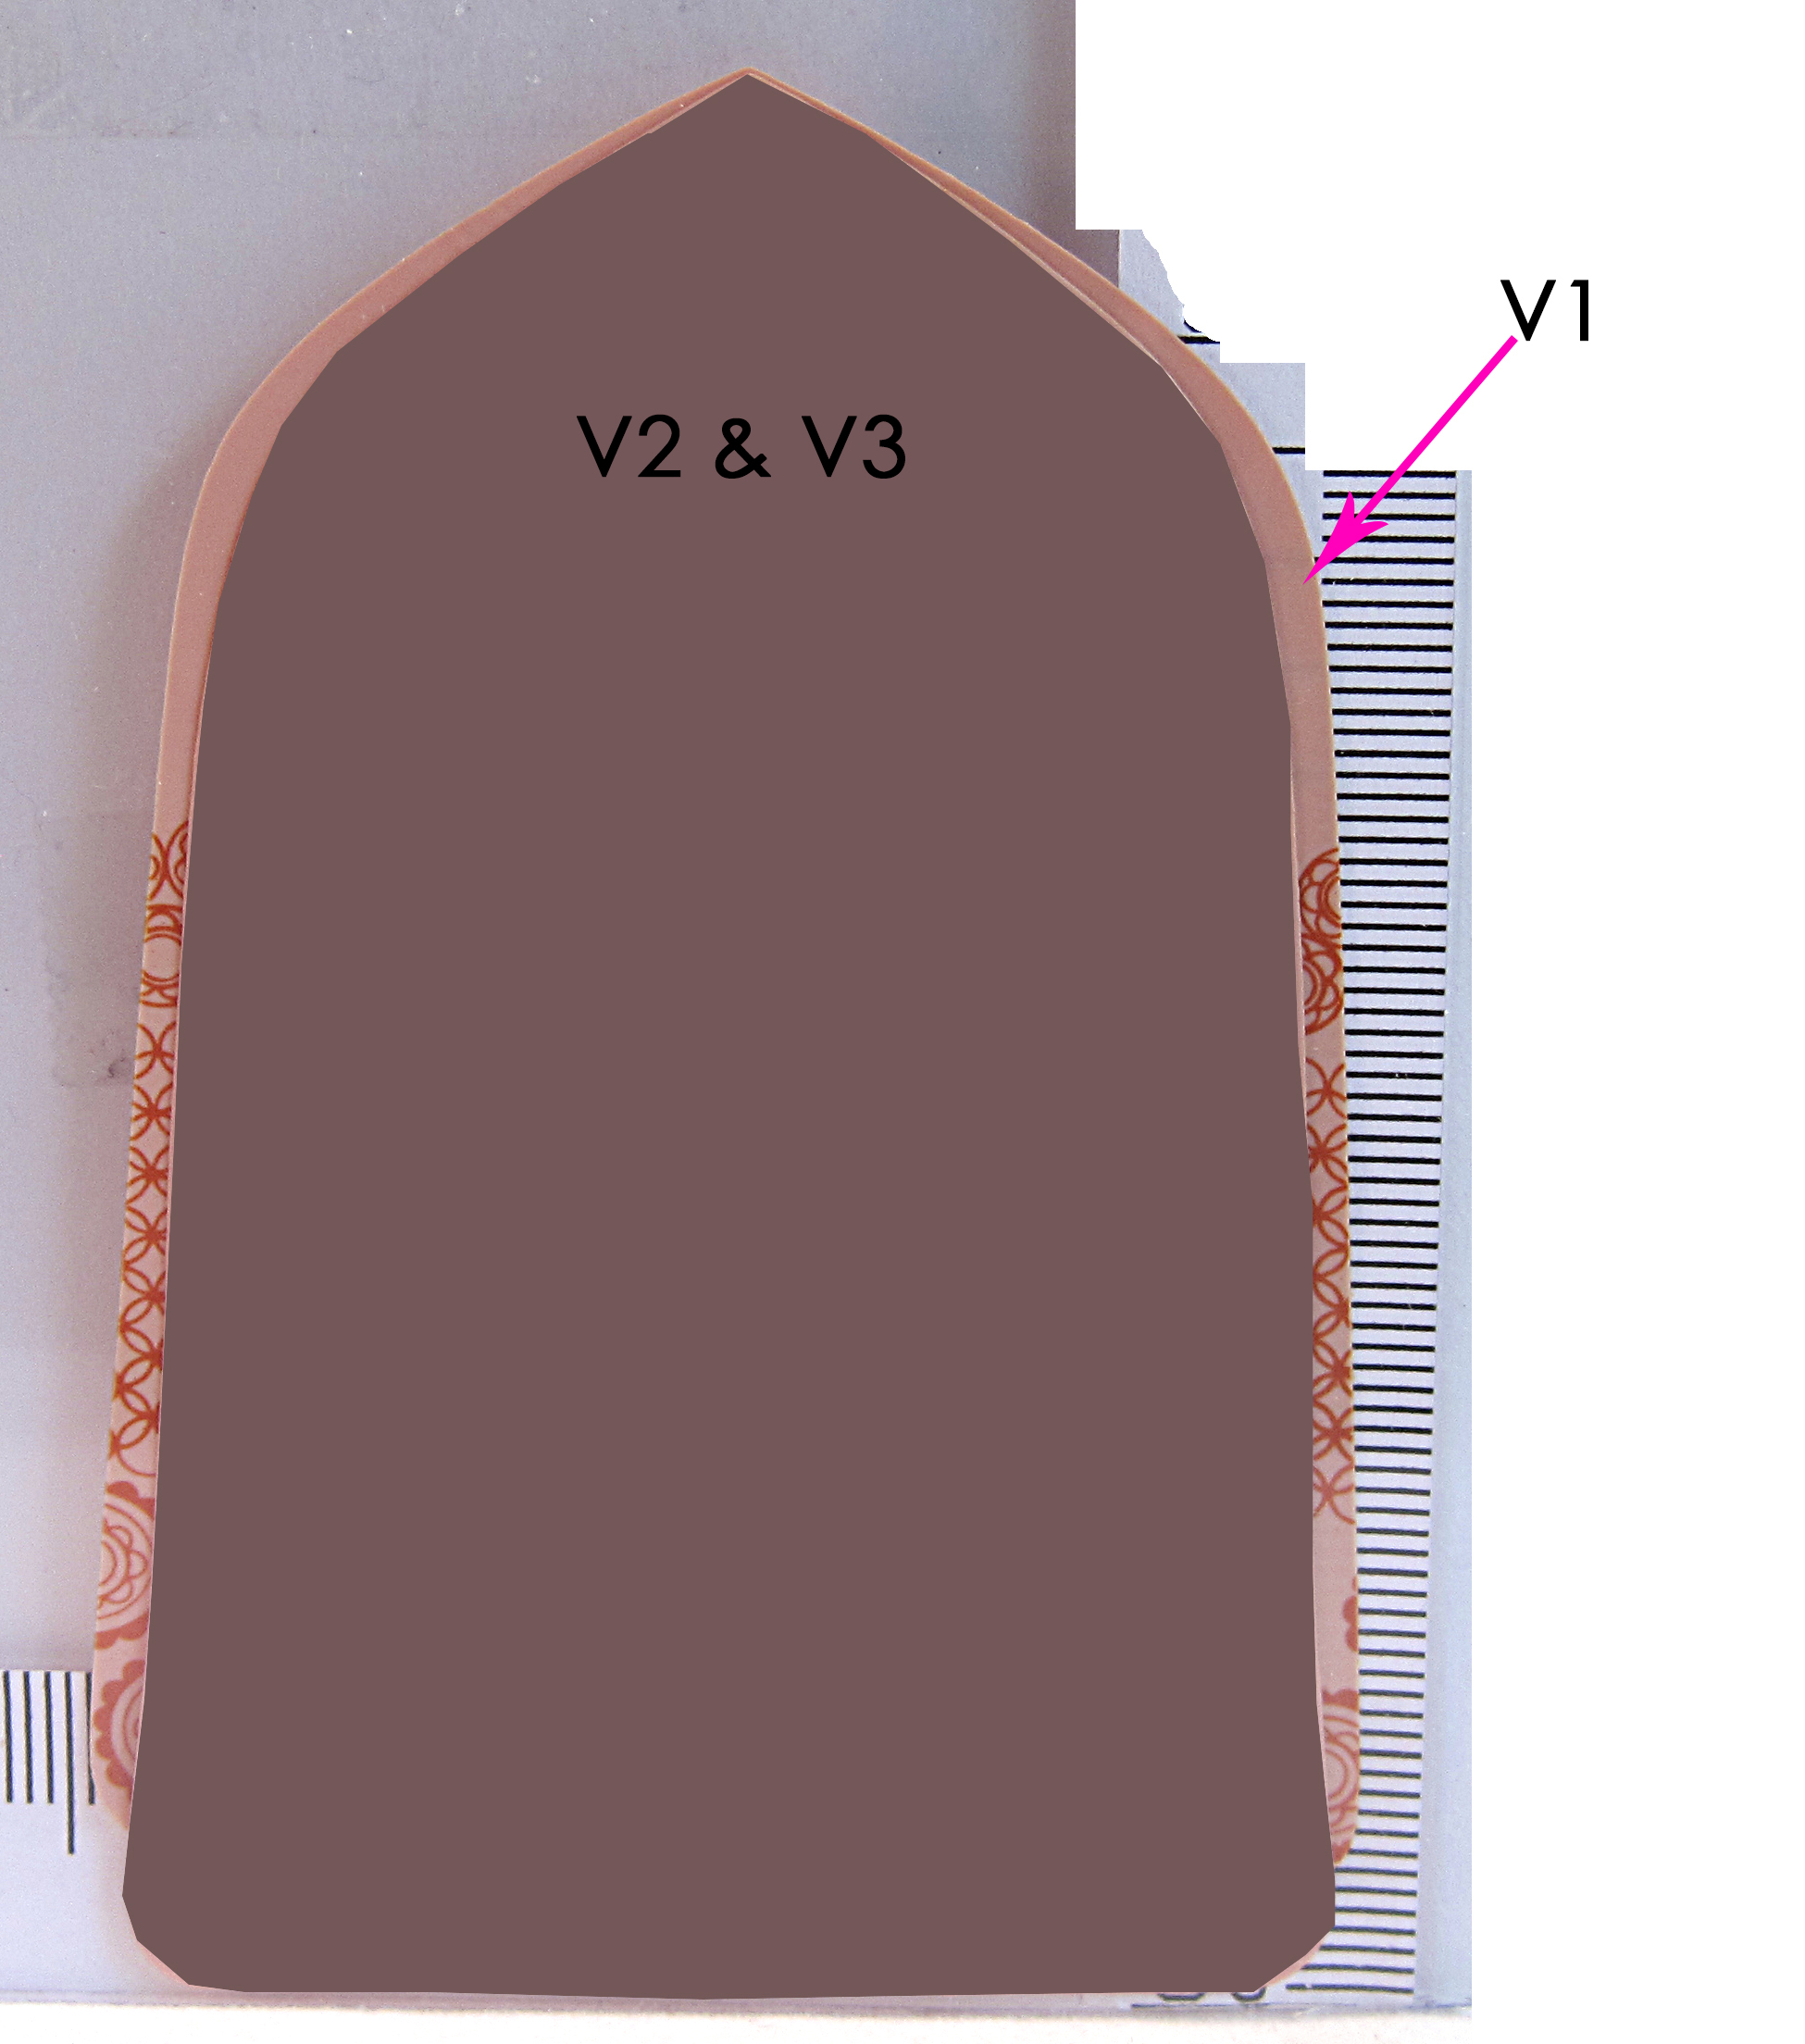
I used V3 in the picture, but the V2 cape is about the same.
Here I darkened the inner section which was a V3 so you could see that it is about 6 mm narrower and 6 mm taller compared to a V1 cape.
The V2/V3 cape's shape reminds me more of a bell.
For those daring souls....
You can straighten up a vinyl cape to get rid of or reduce creases and make arm holes close to factory fresh.
DO THIS AT YOUR OWN RISK!
WEAR PROTECTIVE GLOVES AND EYE SHIELDING!
Use a 2 Cup measuring glass (anything glass or mug should work) and fill it with 1 inch of water.
Use a microwave to boil the water.
Once boiled, put 1/2 the cape in the boiling water for 3 seconds. Turn it around and do the same for the other half.
Place the cape between 2 standard size photographs (NOT INK JET - OLD SCHOOL SILVER HALIDE PHOTOS!) so the cape is sandwiched between the back side (do not put the cape touching the actual picture - the cape should touch the backing).
Once sandwiched, apply pressure to it against a counter or table top for 10 seconds.
Run cold water over the sandwich and peel the photos apart and let the cape separate.
Pat the cape dry with paper towels and you are done!
Your cape should be much nicer now for photos or just for a rejuvenated look.
I have never damaged a cape this way. It is just hot water with no chemicals.
Again, use at your own discretion.
This cape is simple to spot since it doesn't have the printed design on it at all.
It doesn't even feel like vinyl It feels more like construction paper.
This is another fake out there that is just a very poor reproduction. It literally is a scanned cape printed on photo paper and hand cut!
And here is the one featured on The Imperial Gunnery.
I haven't seen this one in person at this time and don't know it's origin.
When looking at it, the only way I can see it is a repro is that the patterns on the bottom are too perfectly spaced. No other capes have perfect spacing like this repro shows.
If you have one, I would love to get my hands on it to take a closer look!